|
Two Page Updates - Sept 10th '19 - Sept 16~18th '19 - Sept 20~27th '19 - Sept 28th/29th '19 |
|
|
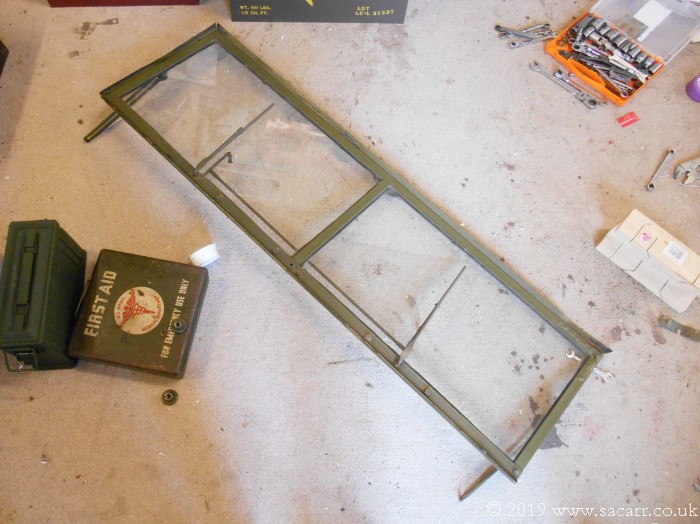
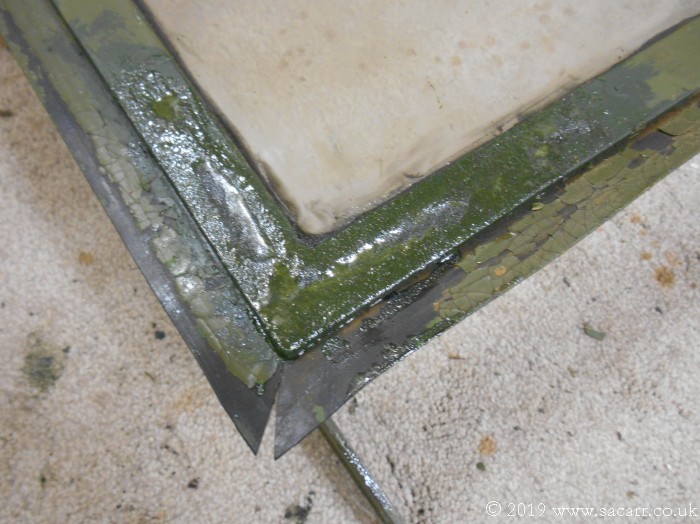
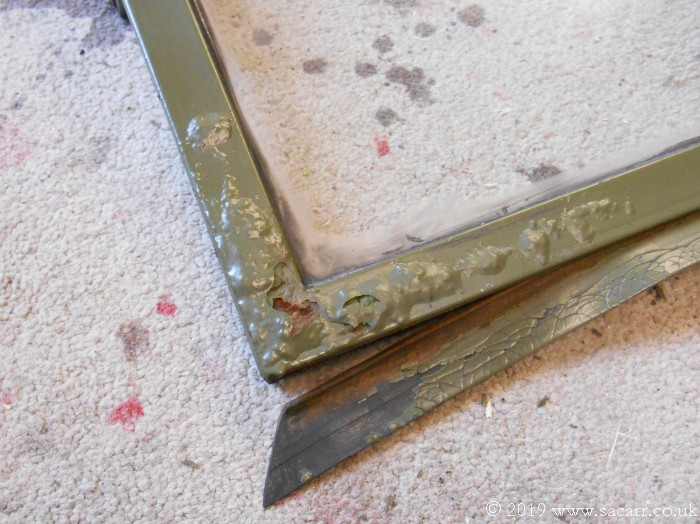
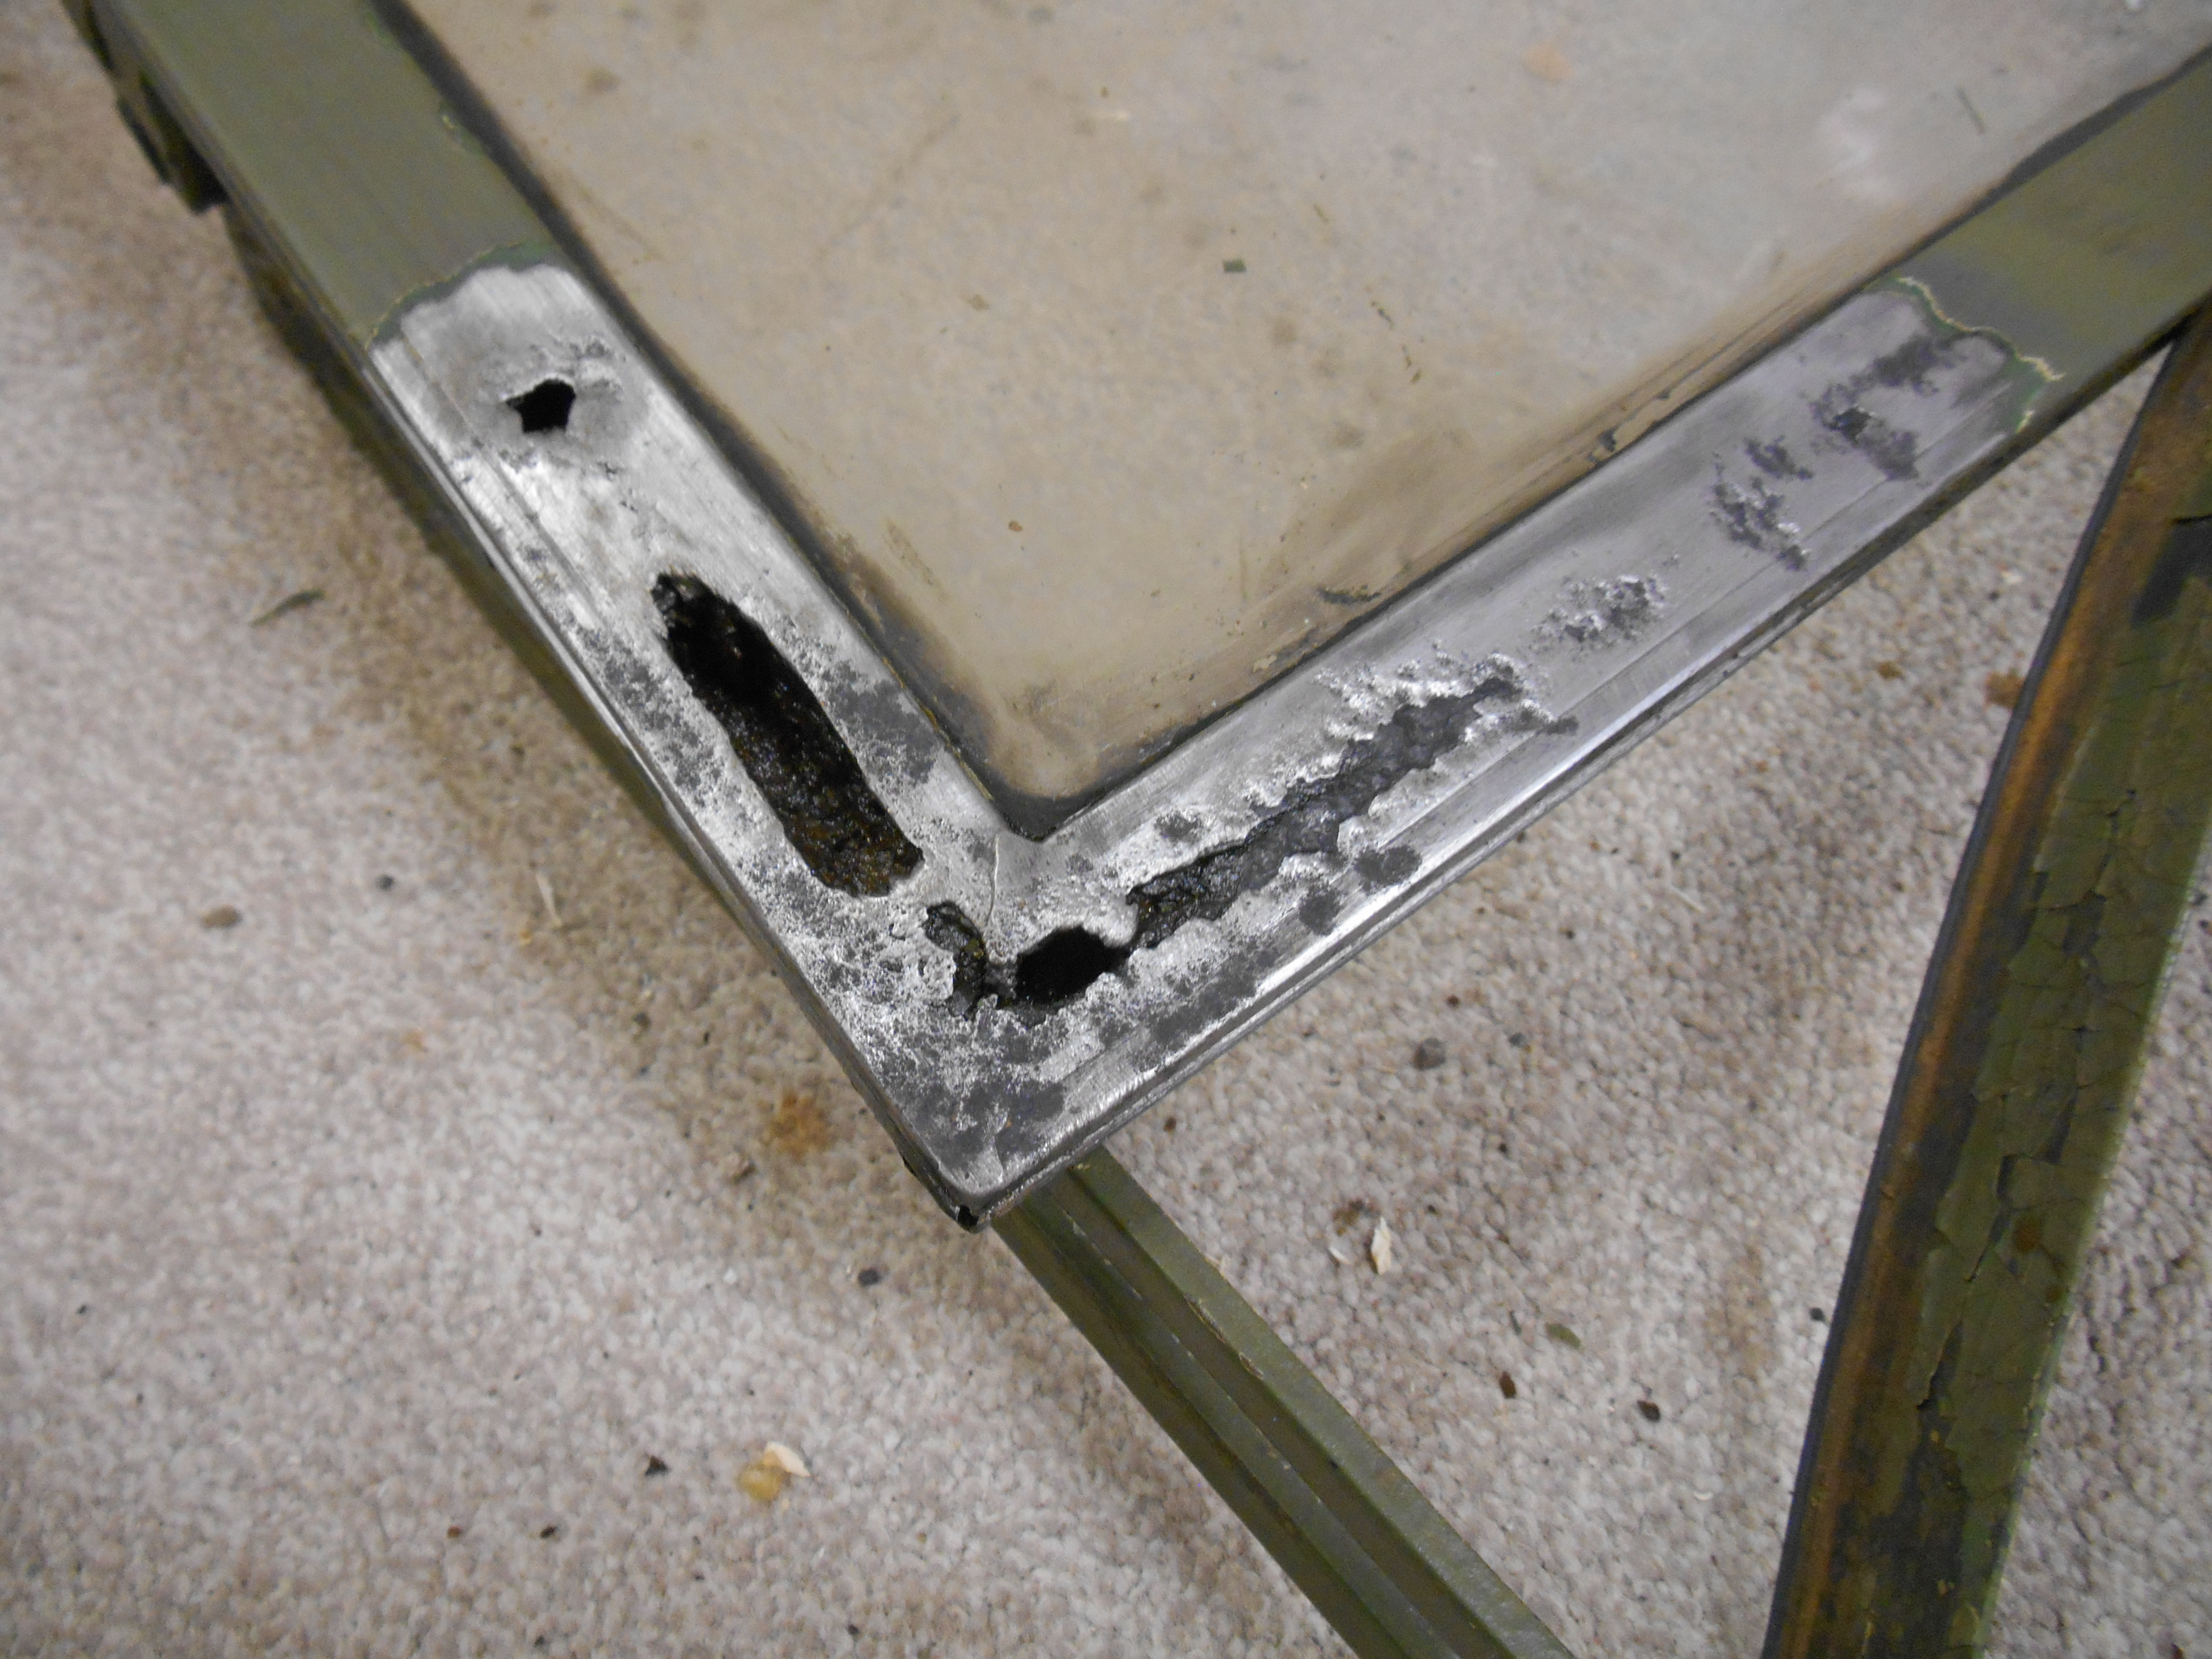
At the Beamish event, I noticed a patch of rust at the
lower corner of the passenger side windscreen. The paint was blistering badly
and the frame looked like it had spread apart a little, allowing the rubber seal
to come loose at the corner.
Other than a school visit in a few weeks time, the events are over for this year, so I have a bit of time to deal with it. At first, the inner screen wouldn't come out of the outer frame. It wouldn't lift up high enough to line up with the slot in the outer frame. I worked out that the bolts filling the holes where the original Hotchkiss screen supports were, prevented the screen opening enough. After they were removed, the screen opened fully and was removed. I used a rotary wire brush to cut through the paint and grind away the surface rust on the outside of the frame. It was then placed in an electrolysis bath to get deep into the rust, inside and outside of the frame. This is just the first step in the repair. |
|
|
|
|
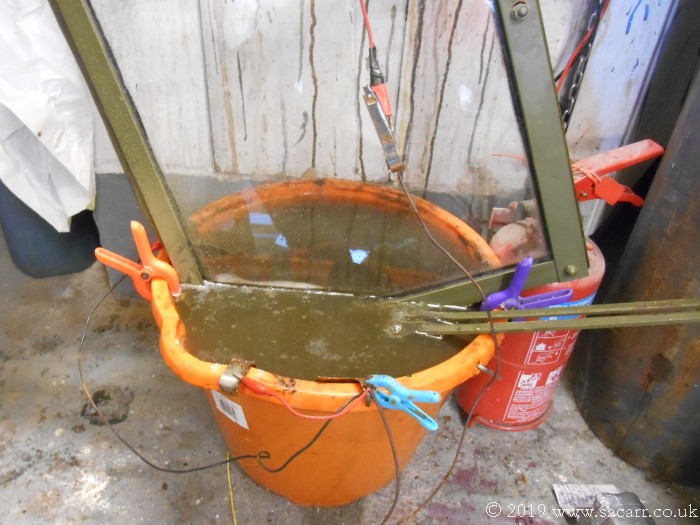
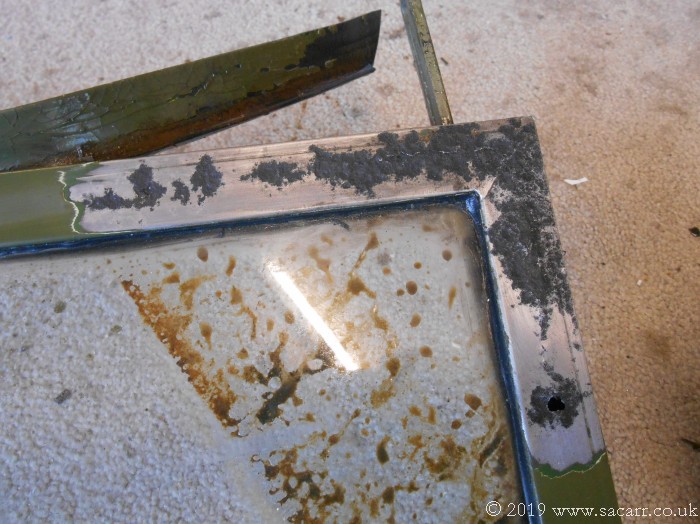
After a little while in the bath, I pulled the screen out to check on the progress. A bit more wire brushing showed a very thin area which was ground out. The screen went back into the electrolysis bath again to work on this area. |
|
|
|
|
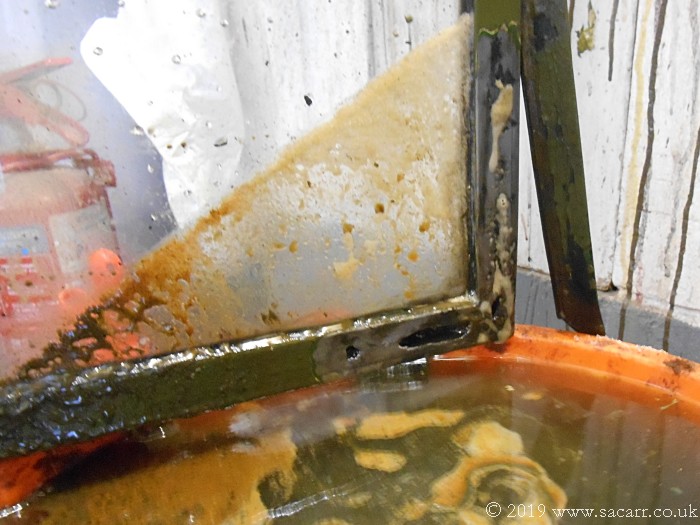
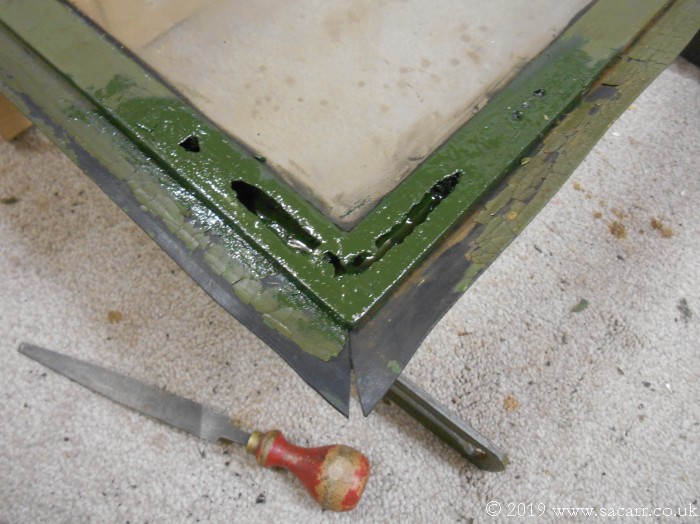
After further electrolysis, the screen was removed and cleaned inside and out, showing the extent of the rot. |
|
|
|
|
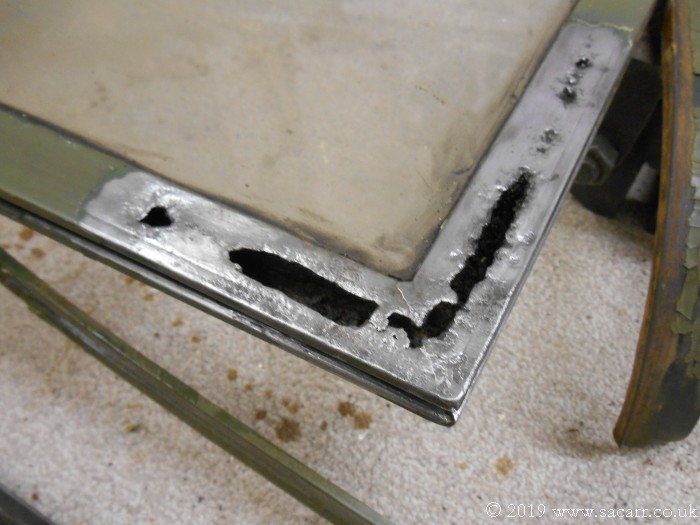
The holes were filled with paint to try and seal the metal internally and the area was then baked in front of a heater. Originally I'd thought about using lots of small welds to fill the holes until I realised how big they were. I was also concerned about heat damage to the glass since it isn't removable. It was siliconed into the frame, probably by he French Army during its service rebuild. After getting a good look at the cleaned up holes, I opted for filling the area with a mix of epoxy resin and iron filings to reinforce the corner. This was left overnight to fully cure. |
|
|
|
|
-----
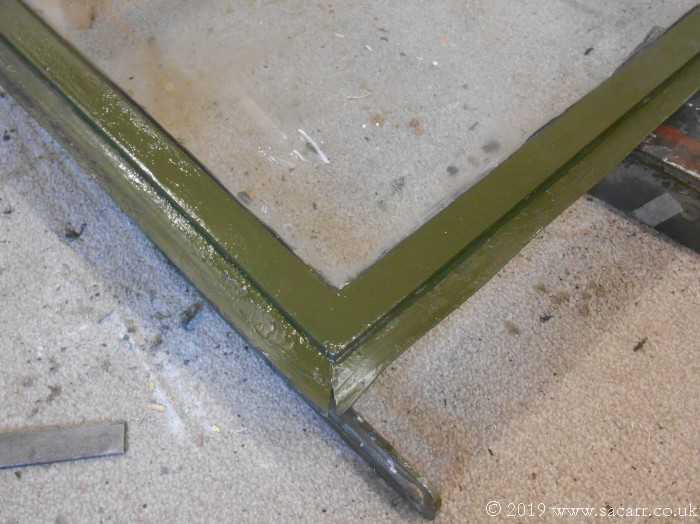
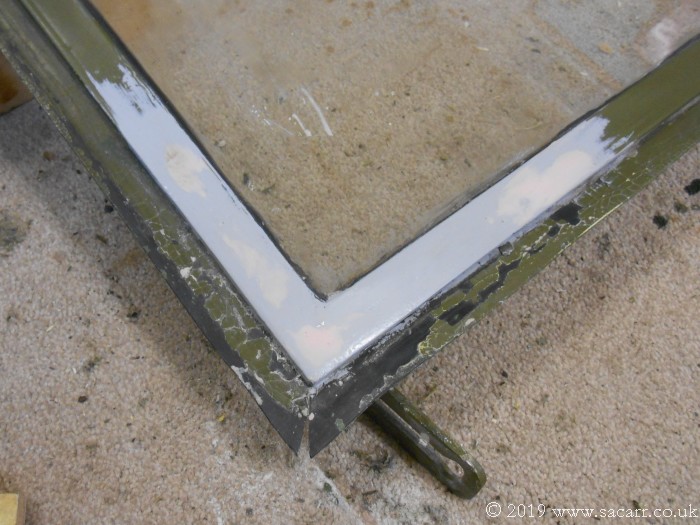
September 29th
The low spots were filled with polyester filler,
sanded, primed and filled again and eventually the olive top coat was
painted. |
|
|
|
|
The paint was left in front of a heater for a while to dry. Before fitting to the Jeep, I sprayed WD40 into the joint between the rubber seals and the frame, to try and get some behind the seals. The screen hinge was then greased and then it was slotted into place in the outer frame on the Jeep. |
|
|
|
|
----- |
|
|
In early September, I made the first crate for camping
gear. This was a single crate for when I go camping on my own. The next two
crates were for when we go away as a family and so needed to carry more of
everything.
So the plan was to make two .50 calibre crates, but rather than buy a heavy repro, I opted for a lightweight thin ply crate. This would keep the weight down and create more internal space. A mock up was made from boards propped up to estimate the internal sizes needed for everything. I worked out that my crates could be close to the original size and so shouldn't look out of place, otherwise I would have probably marked them up as random parts crates. The originals had a machined handle in the thick end plank. Since I was using thin ply, I needed to build a wooden box to create the slot. The rest of the boxes came together fairly quickly and were given several coats of paint mixed with waterproof PVA glue to seal, colour and waterproof the wood. |
|
|
|
|
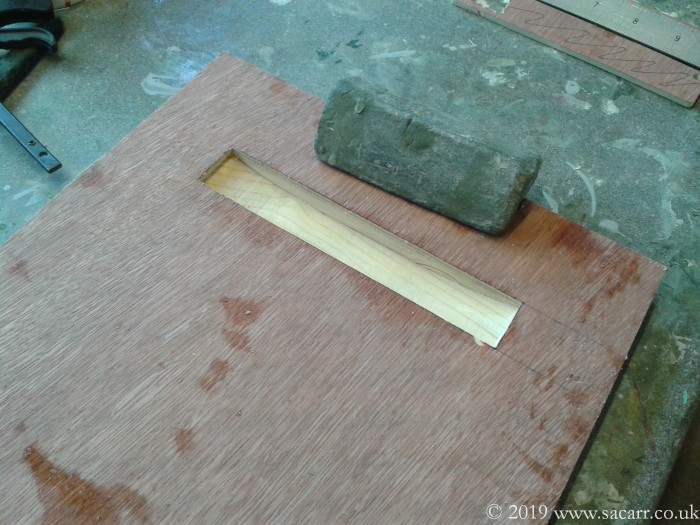
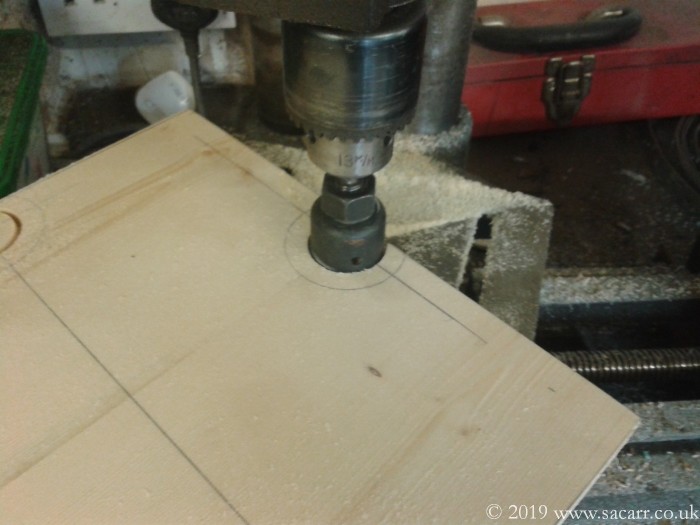
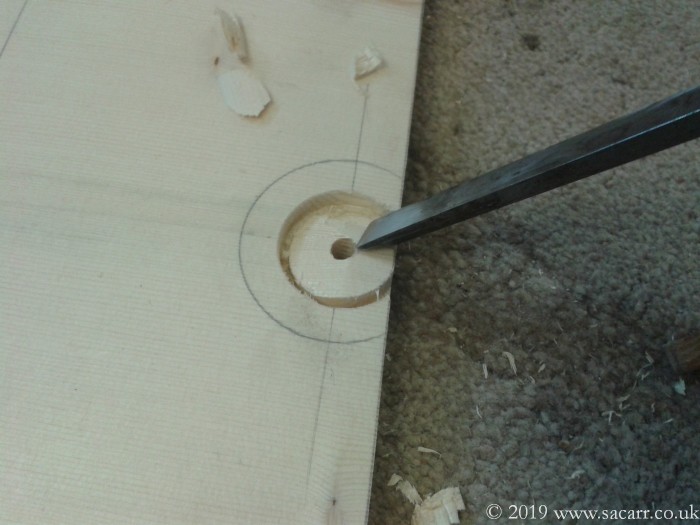
The lid was going to be the hard part of the project due to the recessed machining of the original for the fasteners. As I didn't have a suitable routing bit, I took a different approach. I used a wood bit to drill a centre hole, then a hole saw to cut half way into the depth of the wood. This was the centre of the hole where the wing nut would sit down into. A larger circle was drawn around the hole with would form the boundary of the tapered recess. |
|
|
|
|
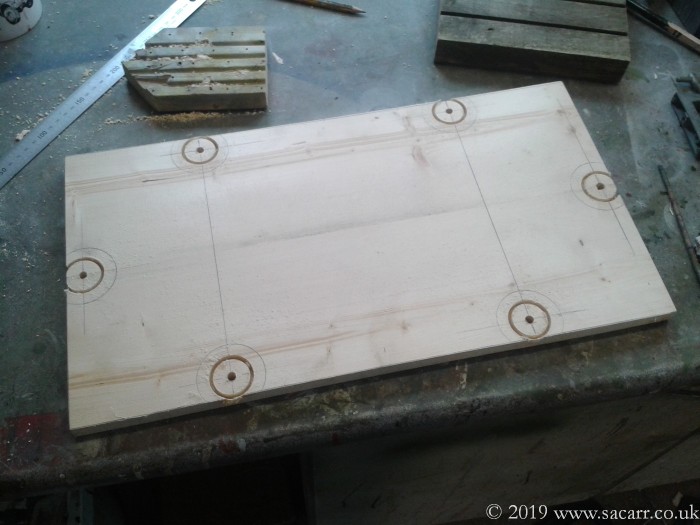
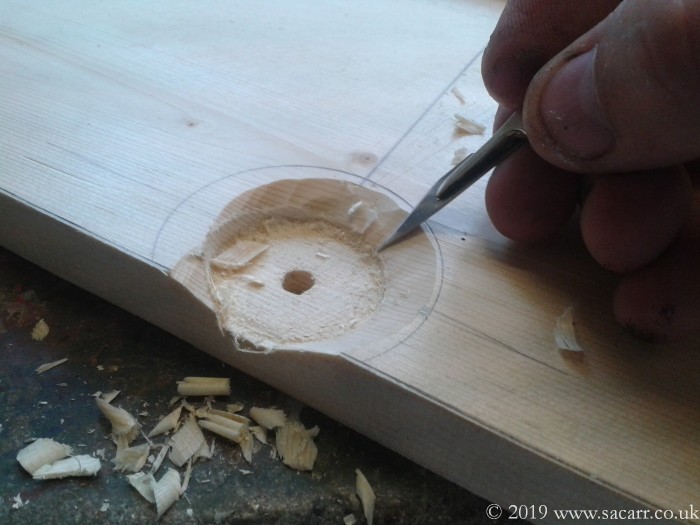
To create the tapered depression, the centre part of wood was chiseled out and then the outer part was carved out with a very sharp scalpel While the pine was still quite hard to carve, the scalpel did a good job and was regularly sharpened. The hole was cleaned up with a mini drum sander before a hand sand to finish off. |
|
|
|
|
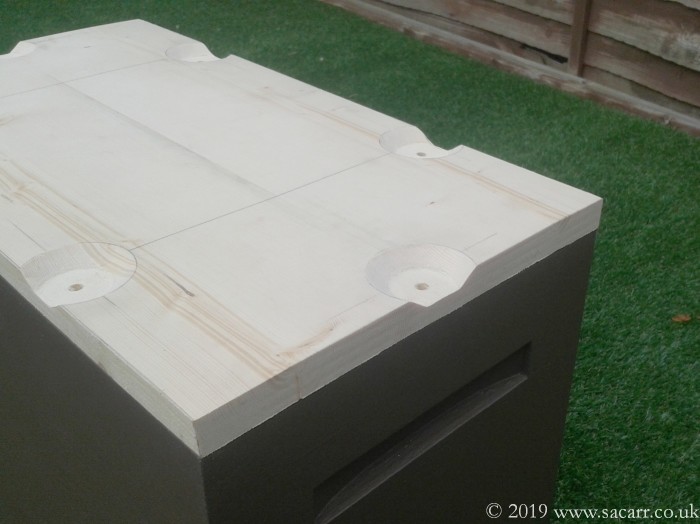
The finished effect was very pleasing and a good representation of the lid of the original crates. While the original lid had six wing nuts to fasten it down, I didn't want the effort of six nuts to open on each crate. Instead I added two dowels to one end that would slot into holes in the end of the box. The other end would use one wing nut to secure the lid. |
|
|
|
|
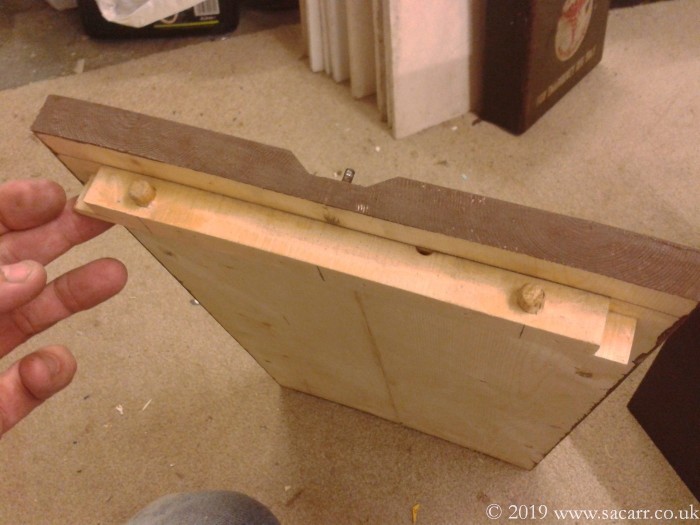
The picture below shows the inside end of the box with the holes that take the dowels from the lid. So five of the wing nuts would be doing nothing, but they needed to be there. I cut several pieces of studding, placed them in the holes and sprinkled fibreglass milled fibres down the holes. I then ran a few drops of thin cyanoacrylate down the hole with solidified thefibres around the studding, locking them in place. This allowed the five non-functioning wing nuts to be permanently screwed ont the lid. |
|
|
|
|
With the fixings complete, I began to paint the lids, again using a paint/PVA mix. Adding the glue not only helped with waterproofing and adhesion, but it also had the effect to filling the wood grain to some degree. |
|
|
|
|
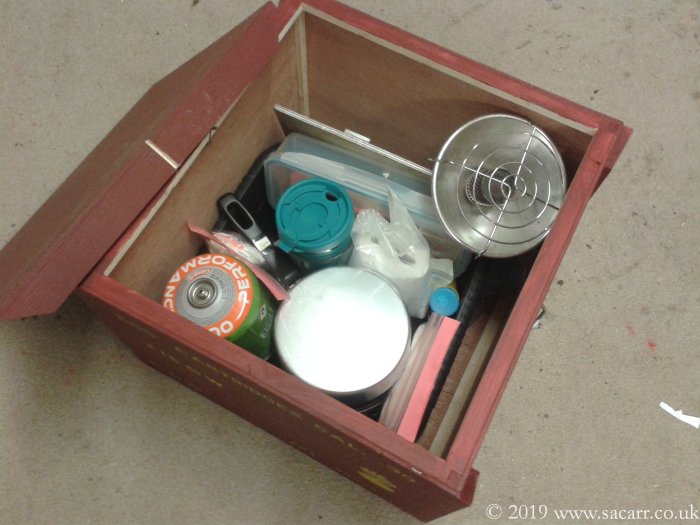
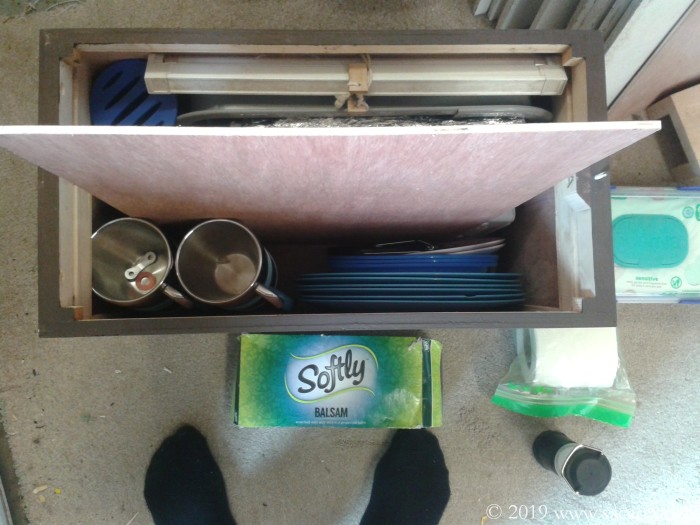
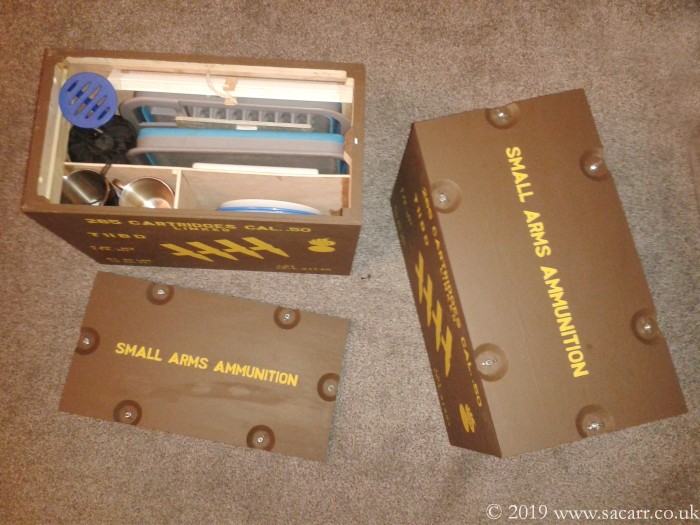
One of the crates was to be left completely empty inside while the other needed some dividers. I had a trial pack to check what went where and marked up where the dividers needed to be. I still had some left over ply from the 8x4 sheet, so this was cut and glued in place to support the plates and cups, with the washing up bowl and other odds and ends. |
|
|
|
|
With the insides sorted, it was time to make the outside look exciting! I used photos of real crates to work out a size for the text and graphics which were then redrawn and printed on normal paper. The paper was then covered in a layer of Sellotape which reinforces the paper and makes cutting delicate stencil bridges easier. They were all cut in one big session with a very sharp scalpel and then taped onto the box with masking tape. |
|
|
|
|
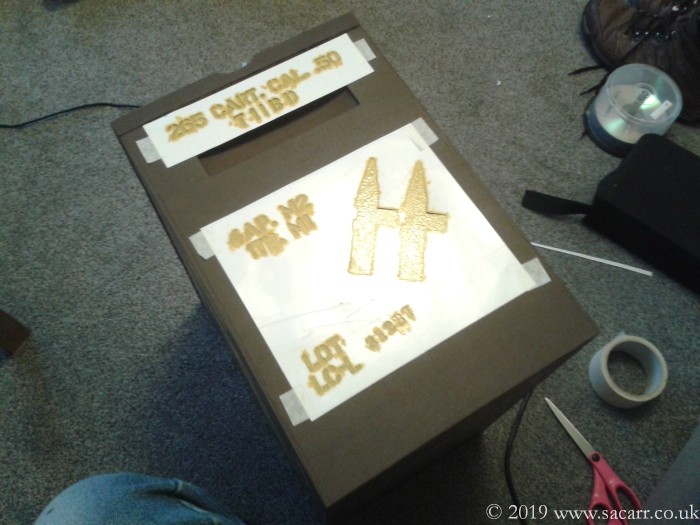
With everything taped down, I began painting using a tin of Humbrol model enamel and a cut down brush to stipple the paint through the stencils. Two coats of paint were applied which gave a reasonable but not too even a coating. The largest side of the first box was done first. |
|
|
|
|
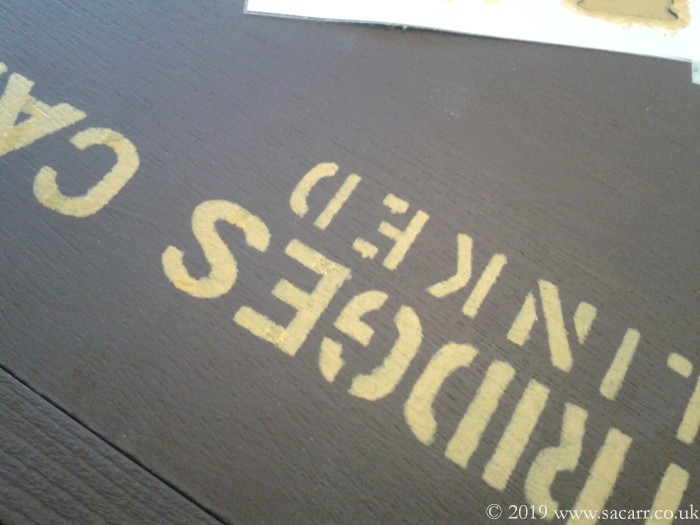
After the stencils were dry enough to remove, I then touched up all the stencil bridges to fill in the gaps. This is because the original boxes were printed rather than stencilled. The end of the first box was done next. |
|
|
|
|
The second box followed while the first was set aside to dry. The last stencils were on the lids and the boxes were then complete. They were left to harden overnight and the contents packed the following morning. |
|
|
|
|
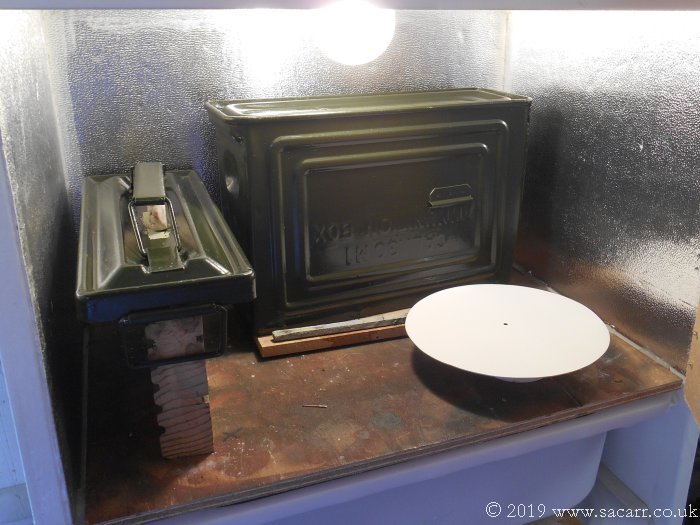
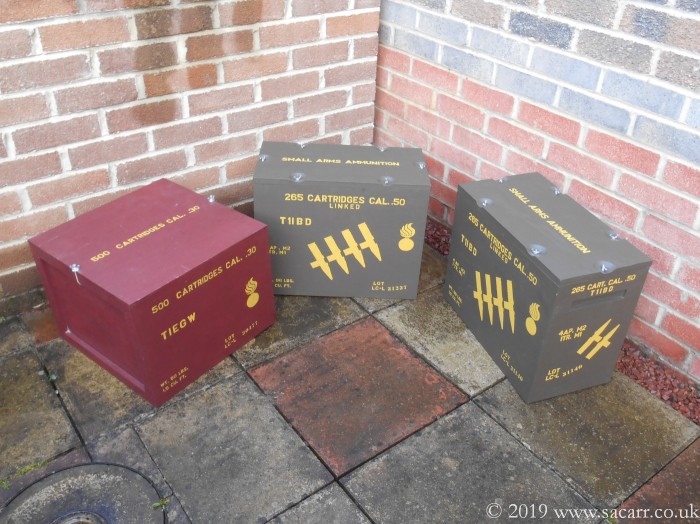
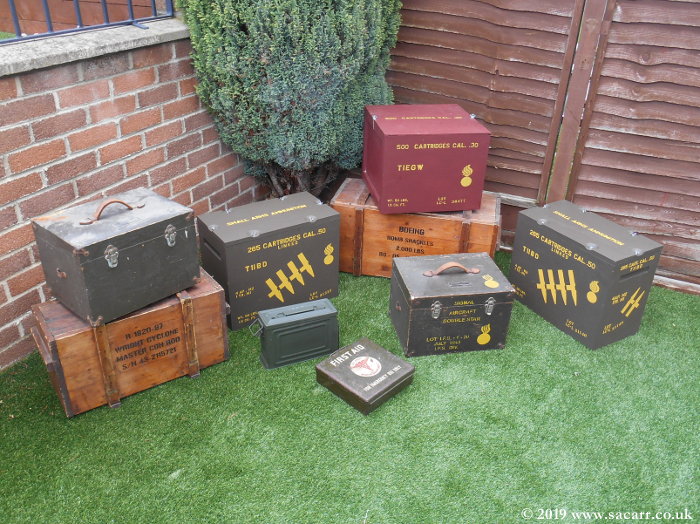
I've got quite a selection of boxes and crates now. In addition to the new .30 and .50 Cal crates, I have two astrograph boxes, two wooden crates made when I first got the Jeep, a .30 Cal tin and a first aid tin. |
|
|
|
|
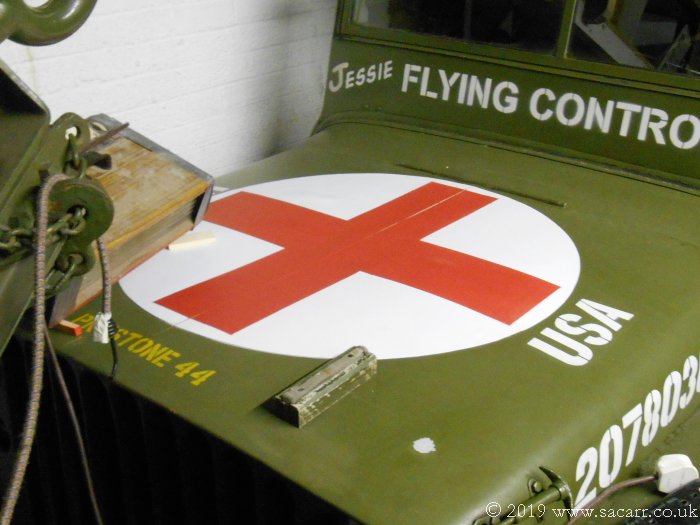
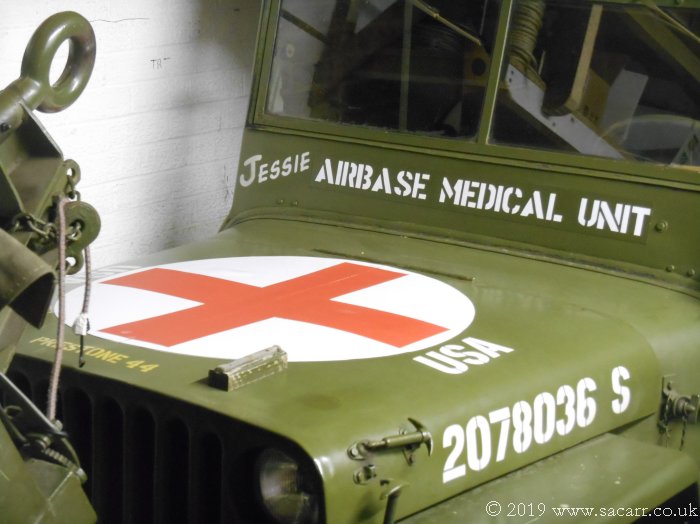
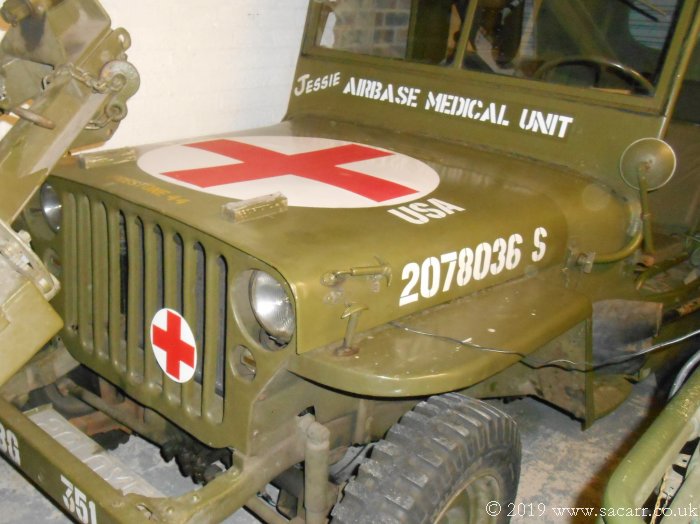
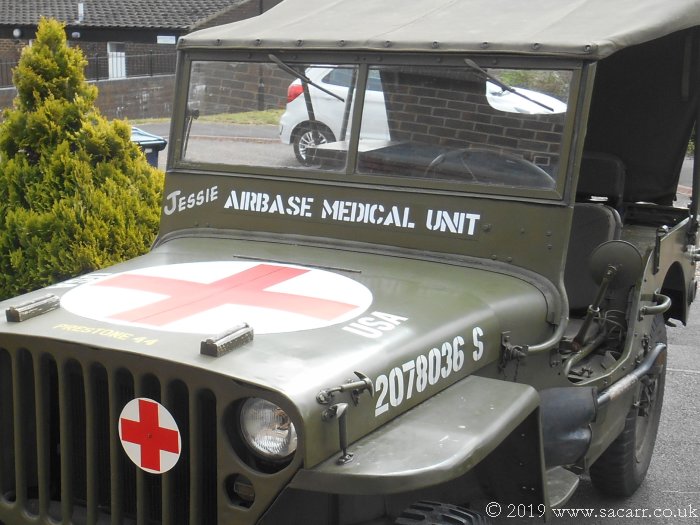
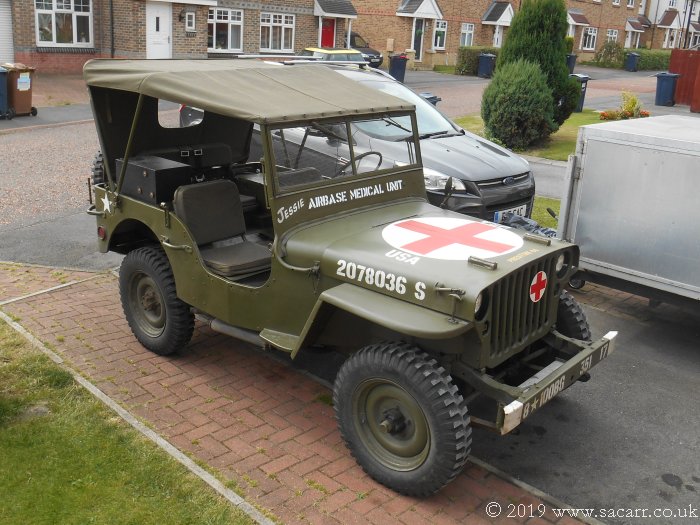
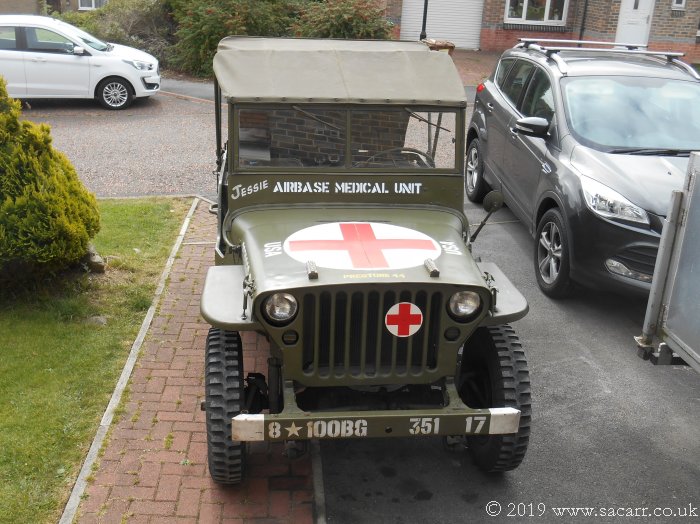
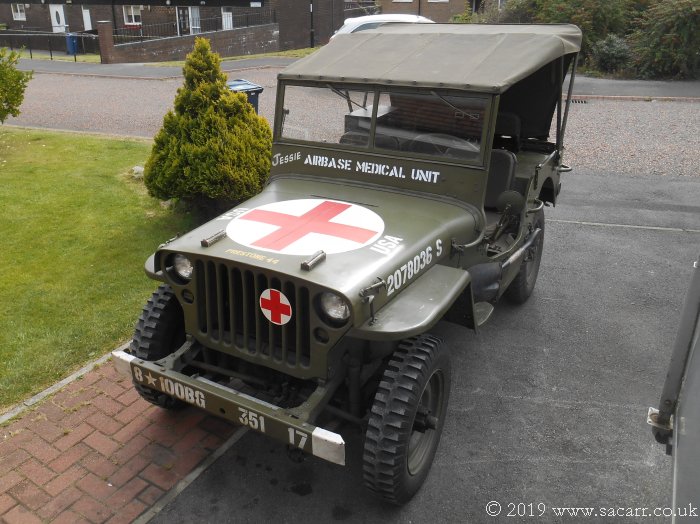
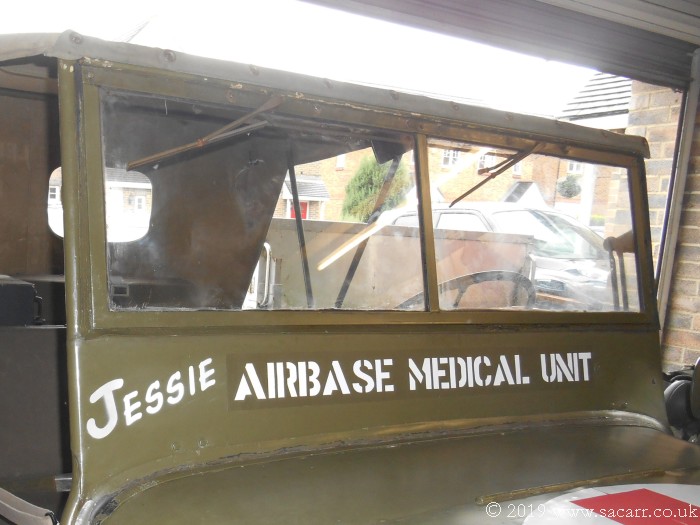
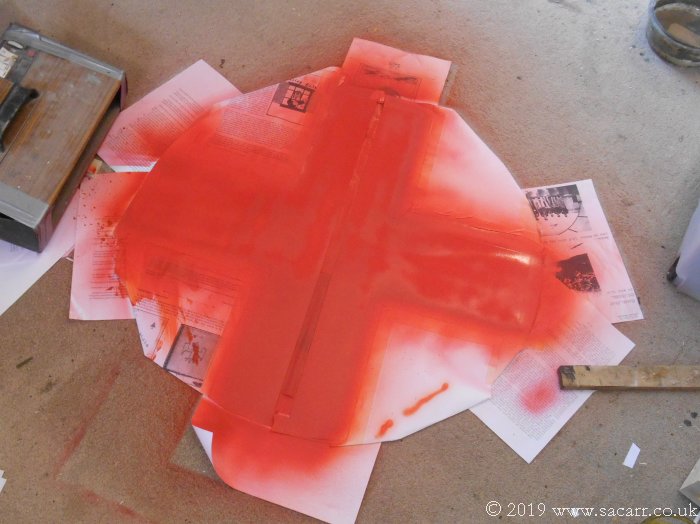
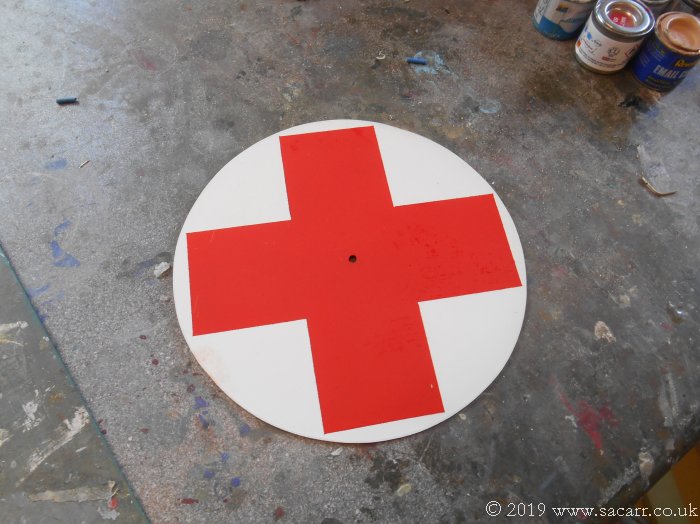
----- September 16~18th - Airbase Medical Jeep Conversion In 2017, I got two rolls of magnetic plastic to convert both Jeeps to RAF markings for the 100th anniversary of the RAF. I had some plastic left over, some of which I used recently to make the "Ordnance Depot" markings. There was still plastic spare and after Beamish, I wondered if I had enough left for yet another scheme. Careful measuring showed there was enough for a planned Red Cross marked Jeep, to go with Lynne's nurse outfit. Covering the hood star, there was enough plastic to make a large, two part, white circle onto which I could paint a red cross. For the front of the Jeep, I cut an aluminium disc, like the RAF roundel I made, but this would also have a red cross. They can be seen below in the early stages of painting. |
|
|
|
|
The large red cross neatly covered the hood star. While I was tinkering in the garage, I also did some olive touch ups on the hood where the headlight bolts press against the underside. To hide the "Flying Control" on the screen, I cut two more strips of plastic which were painted up with "Airbase Medical Unit". I didn't have enough left to make one long strip. |
|
|
|
|
|
The small aluminium disc was baked for some time after being sprayed white and was then masked up for a red cross to be sprayed. Once dry, this would be mounted with the original bracket made for the RAF roundel. It is a 'T' shaped piece of wood with a threaded insert for a bolt. The Red cross disc and 'T' bracket clamp around the grill bars. |
|
|
|
|
On September 18th, the Jeep was rolled out onto the drive in the new markings for the first time. They were completed just in time for the Tanfield Railway 1940's event this weekend. |
|
|
|
|
|
|
|
|
----- At the Aln Valley and Beamish events, we were camping in our 1940's canvas tents with the central kitchen/living area. I realised it would probably look better if all our pots, pans and other camping tat were hidden in a 1940's style ammo crate or similar, rather than a plastic box ( thinks a bit, doodles on some paper and heads to B&Q! ). Lynne brings EVERYTHING camping, including a fold up kitchen
sink. I worked out that two boxes around the size of a .50 Cal ammo crate should
hold all the plates, pots, pans, cups and washing up bowls etc., that she deems
necessary. |
|
|
Sometimes I camp on my own at events, and have a
more minimal selection of camping equipment. We have enough stuff to
make two separate sets of most of the things we would need. As a result,
I would make another box for just my stuff, making it easy to have
everything to hand in one crate in my 10ft ridge tent.
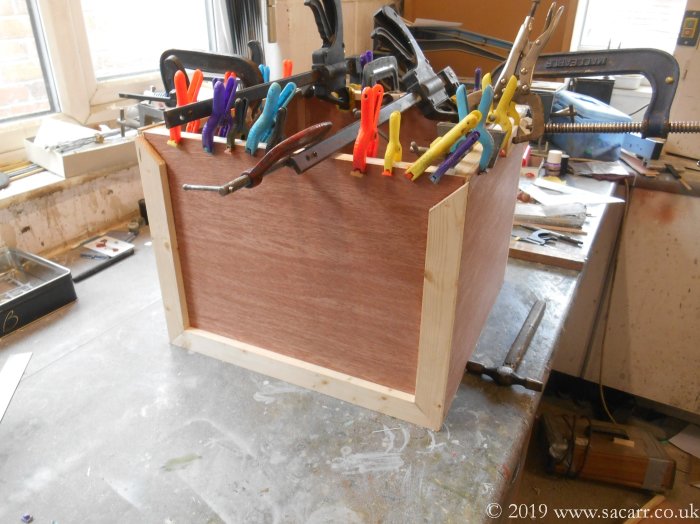
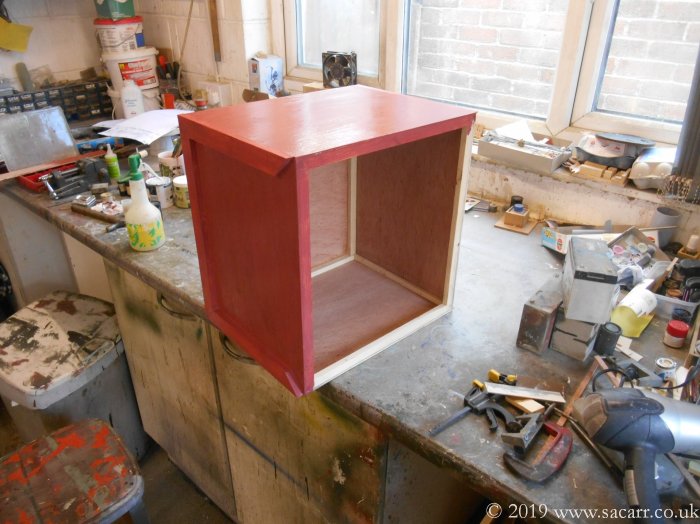
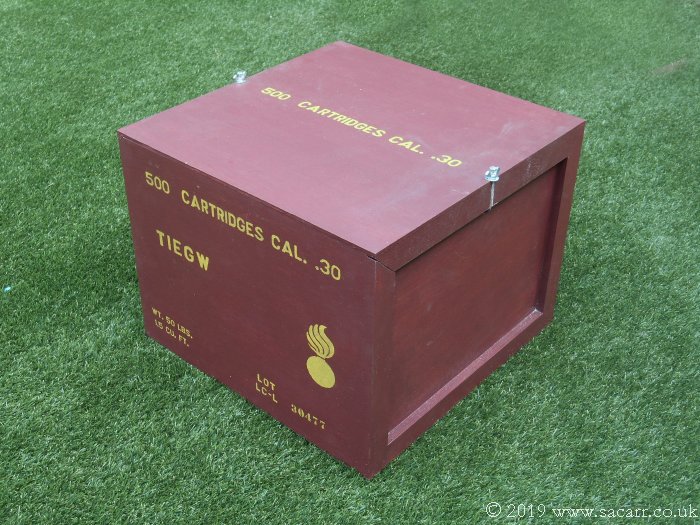
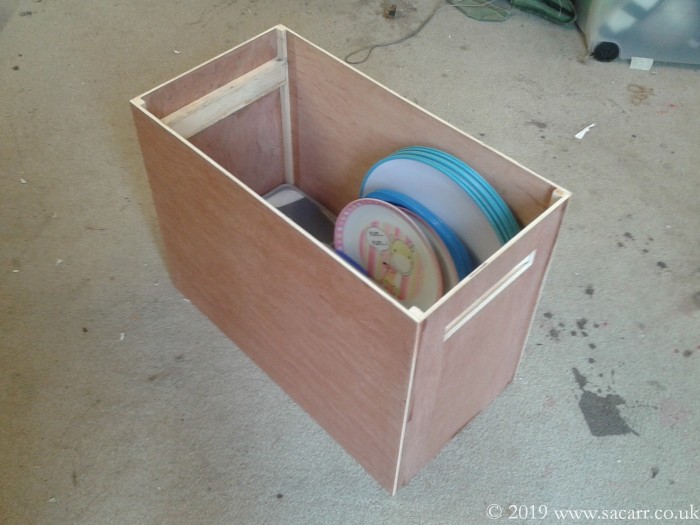
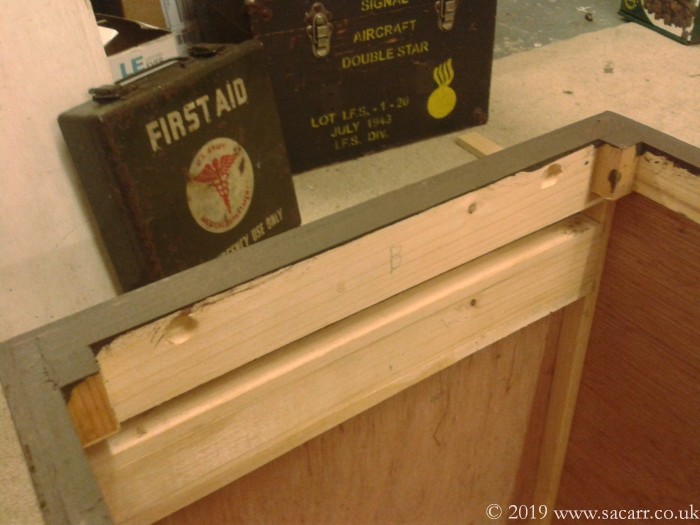
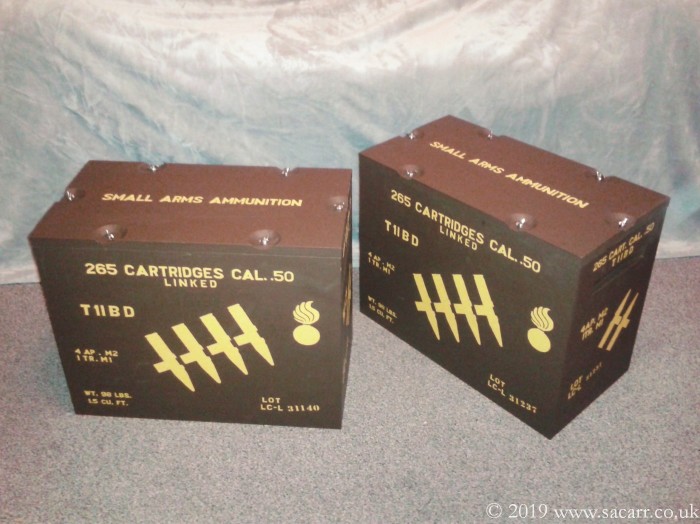
My single crate was built first, mainly because I needed it for the Sandtoft 1940's day on Sept 14th. This one is based on photos of a wooden crate that would hold two metal cans of .30 calibre ammunition, though a bit bigger to accommodate a large plastic washing up bowl into which everything else packed. It is 16" x 16" x 12" in size and big enough for all my solo camping stuff and room to spare for any other odds and ends I may need. The end was started first, with three battens glued on with a slight over hang to form a lip for the sides to glue into. Both of these were cut and glued first, followed by the sides. |
|
|
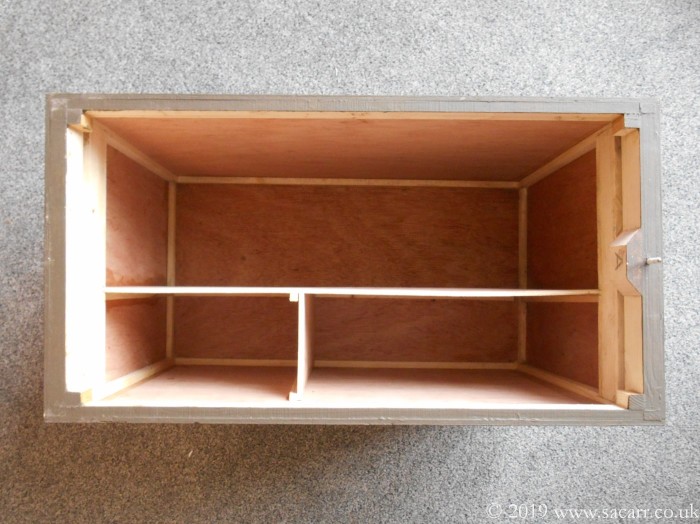
The ends were glued and panel pinned onto the base, after which the two sides were also glued and nailed. After a while to dry, further battens were added to stiffen the box and support the lid. The box itself was made from 3/16 ply to keep the weight down. This was preferred to the weight and cost of just buying ready made crates. It also meant the sizes could be adjusted a little to suit the contents. The lid was a flat piece of ply with battens on the ends to complete the end panel and as an anti warp strip.
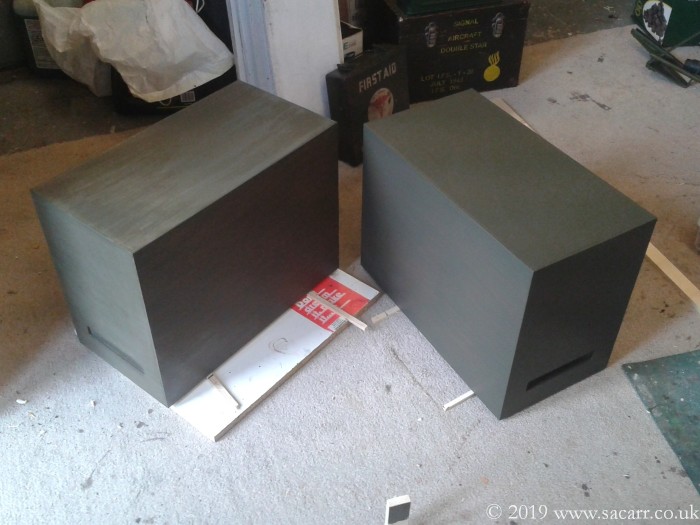
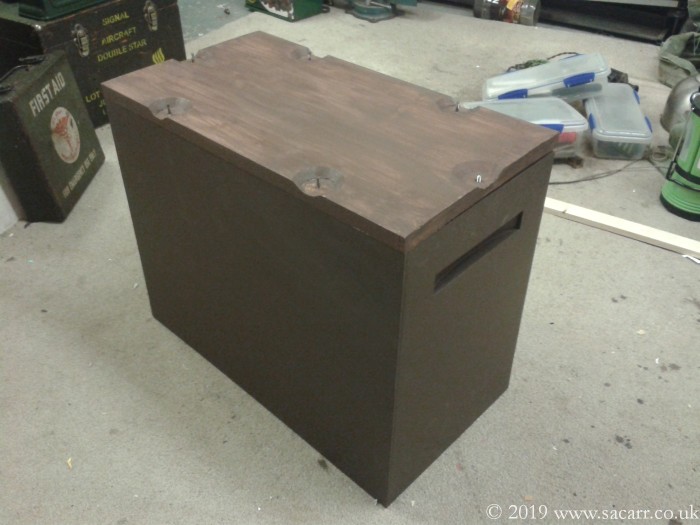
Once dry, the box was painted with a dilute
paint/Waterproof PVA mix to seal the wood from damp. It was given three coats
before a final paint only coat, gradually darkening with each coat and also as
the paint cured. The early coats looked very red, but it ended up a red/brown
close to an original box I had a picture of. |
|
|
|
|
|
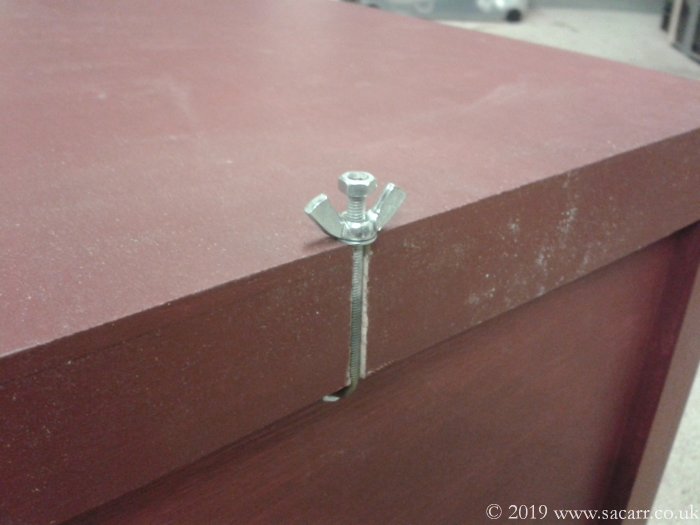
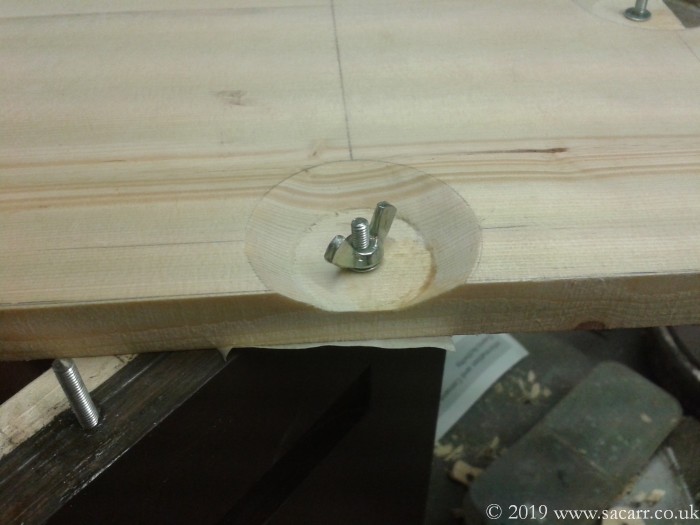
I pondered for a while on a way to fasten the lid, as the edges of the battens would also form the lifting handles to carry the crate. The original crate was wrapped in wire to hold it together, but I wanted something that would open and close repeatedly. I settled on some studding, pivoted through a hole in the end of the box and running up a slot in the batten on the end of the lid. On the top was a wing nut which would tighten down on the lid and hold it in place. A quick flick to loosen the nut, tip the studding out of the way and the lid would lift free. Another nut was added to the end of the studding to stop the wing but from coming right off. It took a bit of work with the blow torch to heat and bend a 90 degree curve into the studding so it didn't snap. Another nut and washer on the inside of the box keep the studding in place. |
|
|
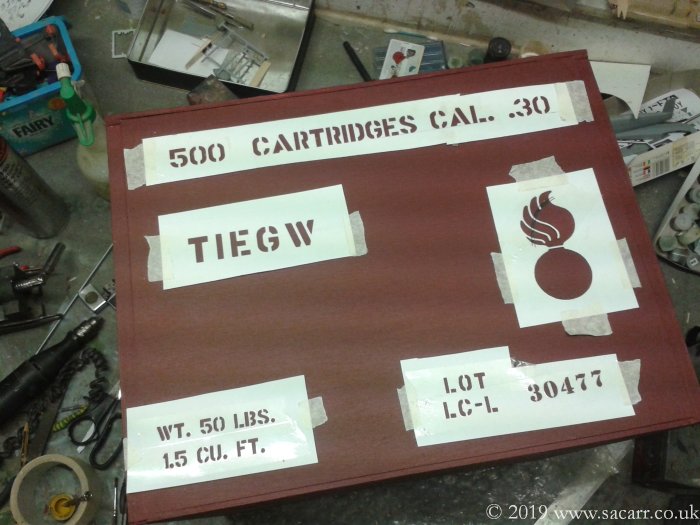
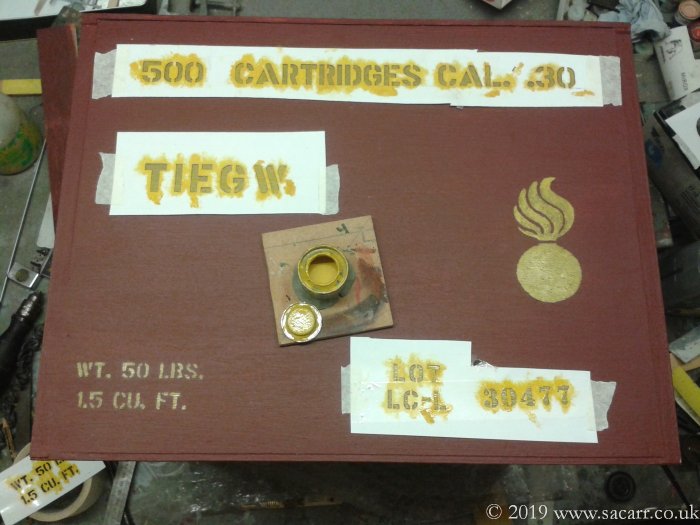
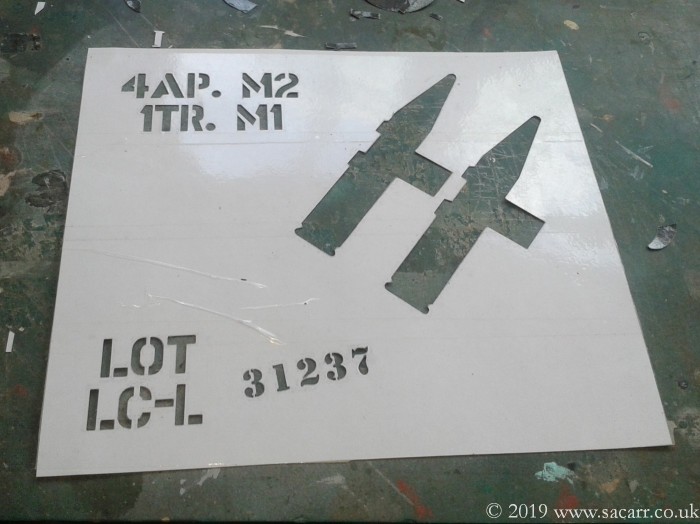
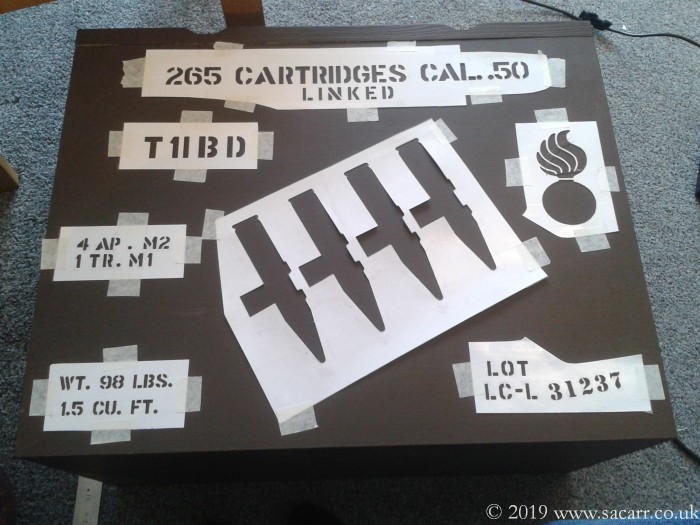
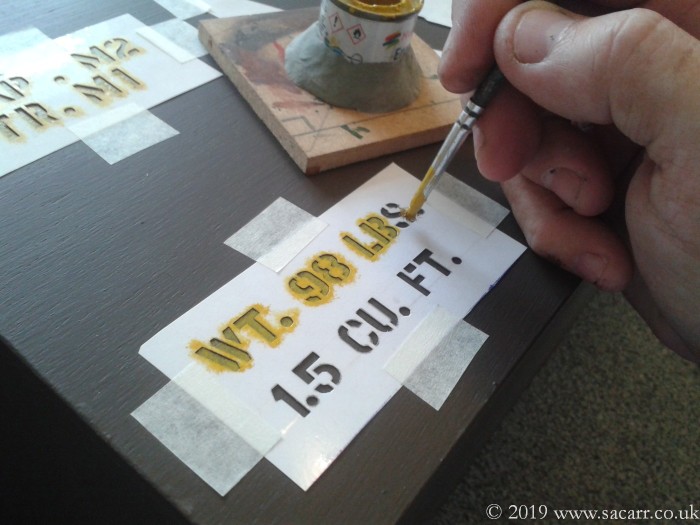
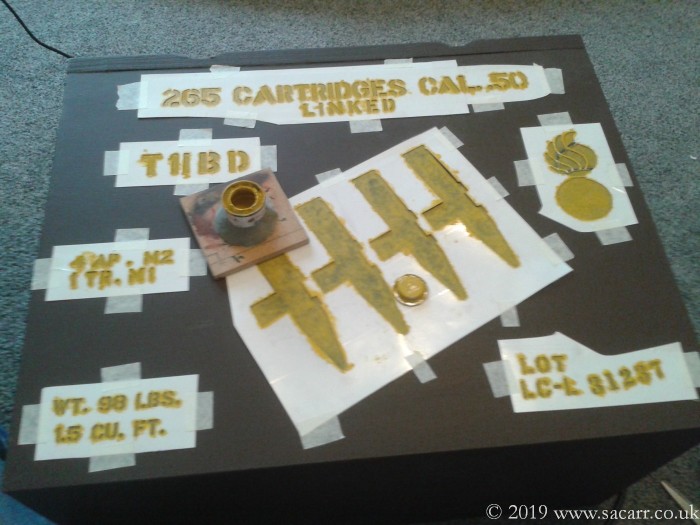
Stencils on the computer came next, doing the artwork loosely based on photos. I'd read that lettering was printed rather than stencilled, but stencilling was clearly the easiest way to go. They were printed onto paper and the paper was then covered with a layer of Sellotape. This would reinforce the small bridges in the stencilled lettering. Out came the scalpel next and some time later, they were all cut. Only the grenade lost a small piece. I would brush that in by hand. The stencils were taped down and yellow model paint
stippled through to create the markings. A couple of coats gave the required
look, bold enough to look good, but not an even enough density that they looked
too good. After the stencils were removed, I used a small brush to fill in all
the stencil bridges, making the lettering have a printed look. Both sides were
painted and one stencil on the lid. |
|
|
|
|
|
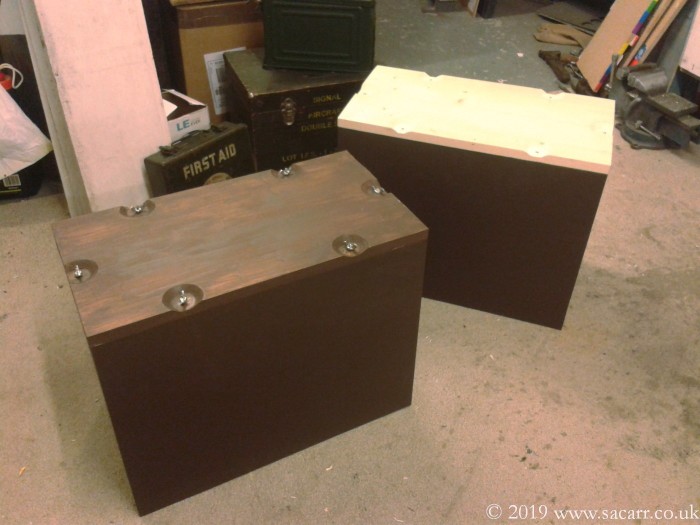
So here's the completed box. I may do a little light sanding here and there to give a bit of wear, but want the paint to have plenty of time to fully harden before I do that. So a frying, cooking and grill pan, plates, cups, kettle, cutlery, camping light, a heater and other odds and ends all fit in with room to spare. The other two crates will be made over the winter
ready for next season. |
|
|
|
|