|
Oct 1st/2nd - Oct 3rd - Oct 4th - Oct 5th - Oct 6th - Oct 7th/8th - Oct 9th/10th - Oct 11th - Oct 12th - Oct 13th/14th - Oct 15th/16th - Oct 17th - Oct 18th/19th - Oct 20th - Oct 23rd - Oct 24th |
|||
| October
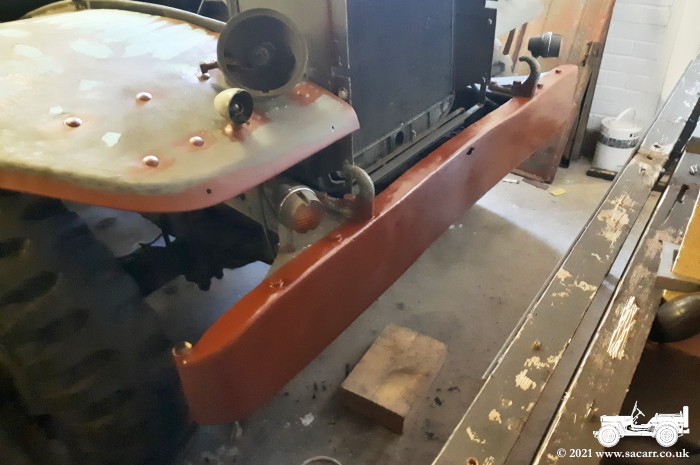
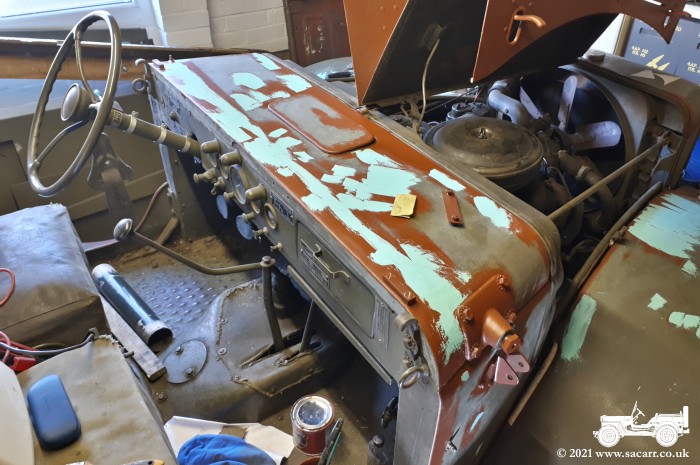
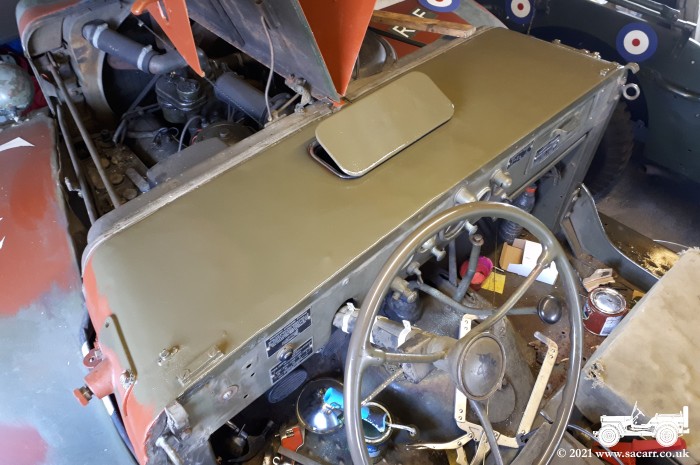
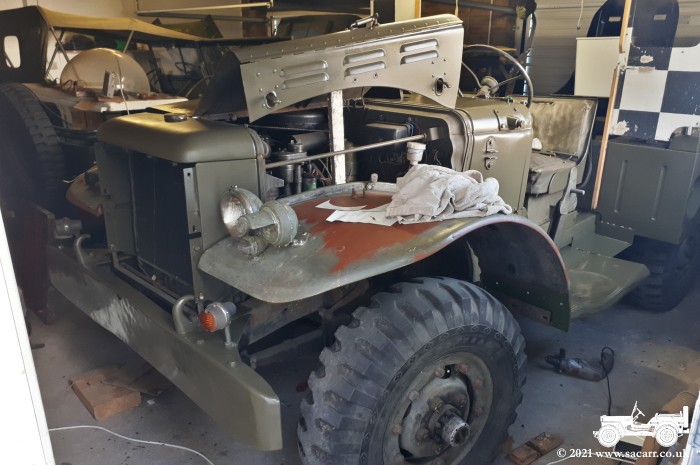
1st/2nd - Filling, Sanding and Priming October 1st - The last couple of days have been spent doing odds and ends on various parts of the Dodge. The passenger step was sanded and primed, followed by the front bumper. Much of the rest of the day was spent with the fine surface filler, applying and sanding it. On the instrument cowl, where the rubber screen seal sits, it gathers water and created a pitted line. There were also a few Norwegian Army welds that hadn't been dressed very well, allowing water to gather. More grinding, filling and sanding to smooth it all out. |
|||
|
|
|
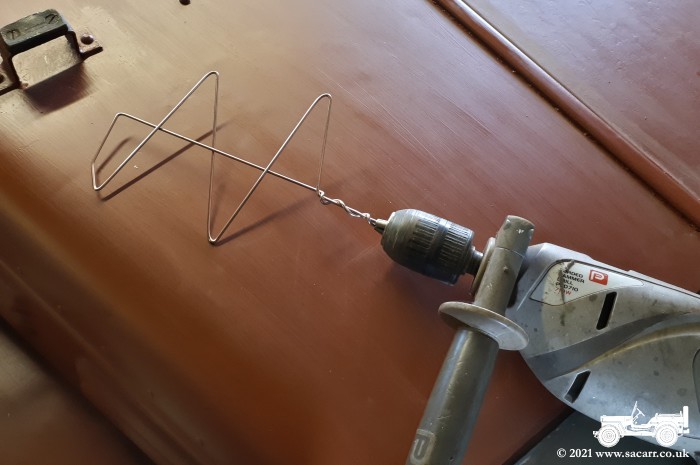
|
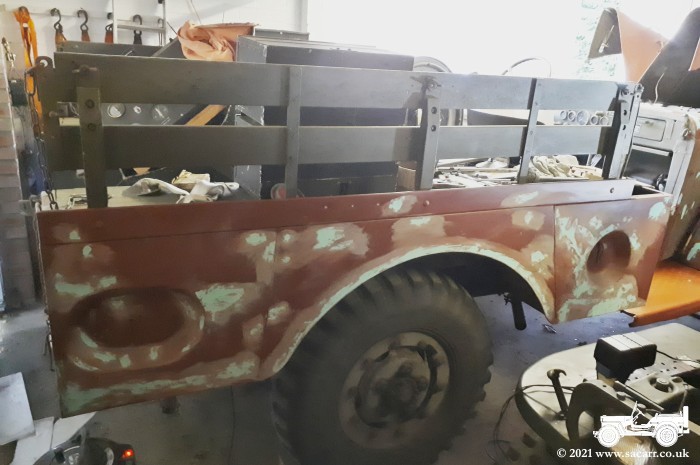
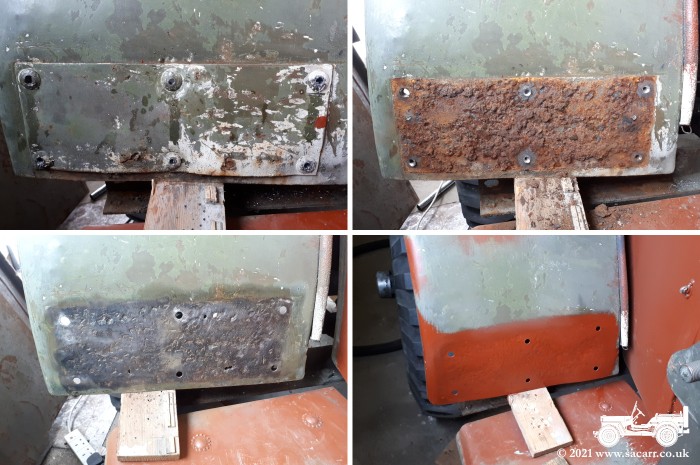
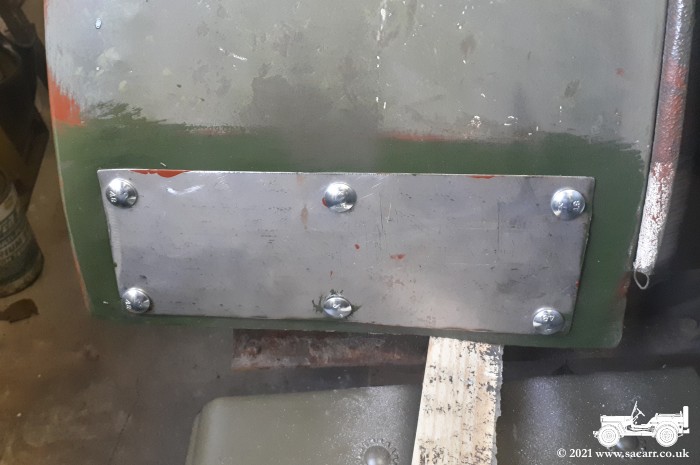
| October 2nd - I started by centre drilling the large rivets on the driver's side fender doubler, followed by larger drills until I broke through the rivets. This wasn't as badly rusted as the other side. While the fender was pitted, there were only a few holes that could be welded up, rather than cutting large chunks of metal out and replacing it. What was there was sound enough to re-attach the fender to its hat channel. A new doubling plate was cut and both it and the hat channel primed. On the other side, the fender and doubler were given a coat of semi-gloss green. These faces wouldn't be seen, so I didn't want to waste the proper olive drab on unseen areas. |
|||
|
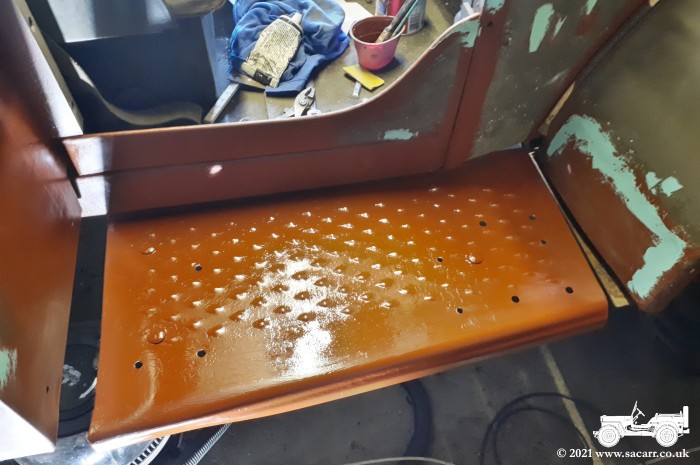
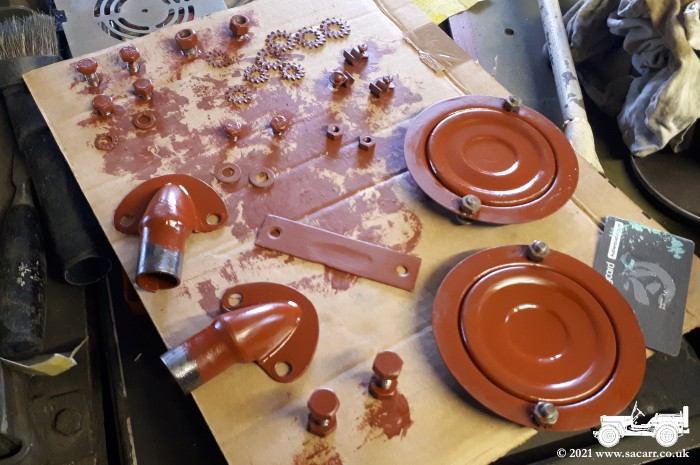
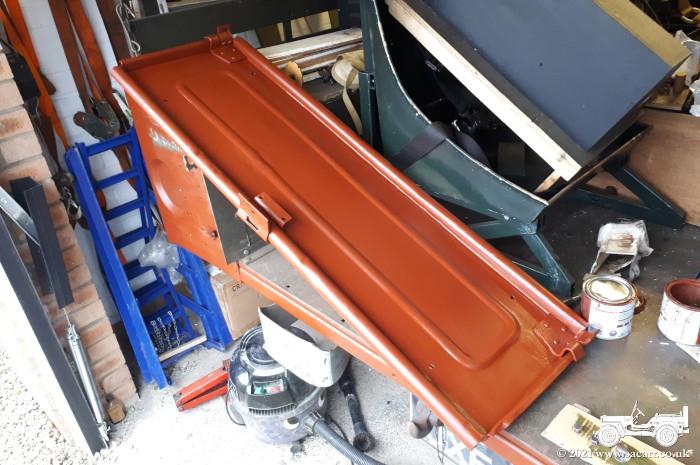
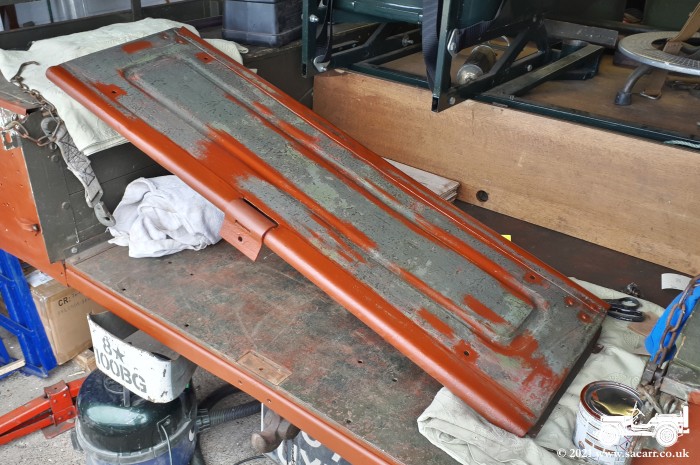
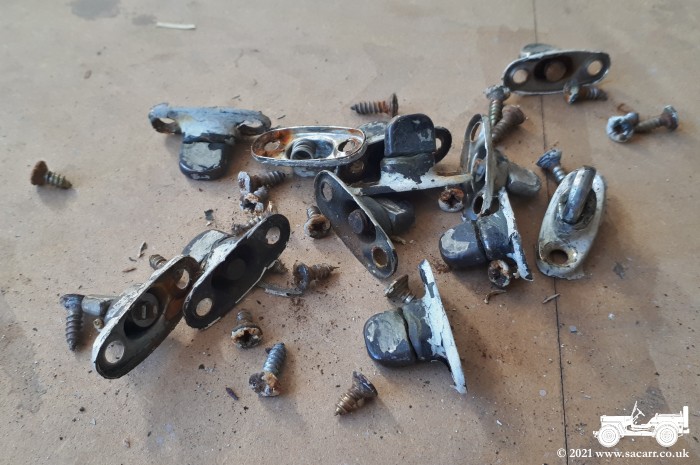
I'm awaiting some short coach bolts in the mail, which will be used to attach the fenders/doublers. Part of the grille was painted in primer, with the other side to be done when it's dry and I can turn it around. I also did quite a bit of cleaning up of nuts, bolts, reflectors and tailgate hinges with the rotary wire brush, followed by a prime. Last job of the day was sanding the tailgate and giving it a coat of primer. |
|
|
|
|
|
|
| ----- | |||
| October
3rd - Painting Olive Drab! At last, adding a bit of colour. I wanted to get some paint on the Dodge today, but there were a few jobs to do before that. The hood hinge needed sanding, the tailgate needed a sand down on the inside and some priming and I needed to have a tidy up of stuff around and in the Dodge to give me better access around for painting. One of the bits in the way was the front roof bow. The best place for it was on the Dodge. I'll be keeping this wooden framework so the cab doors can still be used. I also made a paint stirrer from a welding rod.
After a good mix of the tin, out came the brush and roller. |
|||
|
|
|
|
|
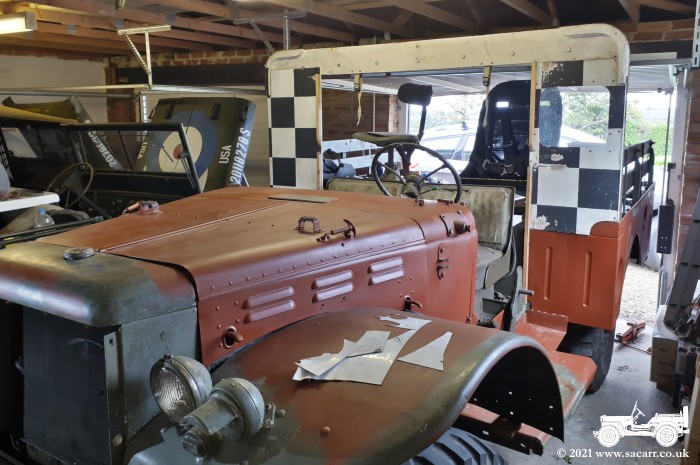
There's lots of awkward seams and indentations on the Dodge, so I figured it would be easier and less chance of missing anything, to brush the paint on, then go over it with the roller to remove the brush strokes. The paint went on well, but it quite thin so is going to need a few coats for good coverage. I started on the rear panel, then moved anti-clockwise around the truck, along the right side towards the front. Everything was given one coat except the fenders, as I'm waiting for the new bolts to arrive. I finished on the tailgate. |
|||
|
|
|
|
|
The paint started out matt on the rear then by the time of the cab had gone a bit glossy. I don't know whether that was anything to do with the temperature or my application, rollering a bit earlier or later after the brush application. It doesn't really matter as the truck needs more coats of paint. Down the left side I spotted several chisel marks which hadn't showed in the matt primer, but did show up in the wet olive drab. I'll give them the fine surface filler treatment and a sand before the next coat of paint. |
|||
|
|
|

|
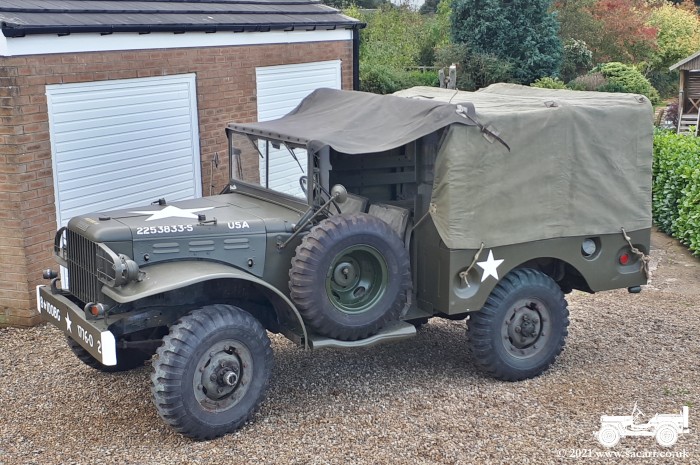
| The paint is Very Dark Drab, a colour used from late 1944 onward. I prefer it to the more brown olive seen on earlier vehicles. The colour is a pretty good match for the original olive drab on the seat frames. A little over two weeks work and it is good to finally see the Dodge mostly in olive drab, as it has never been O/D in my ownership. |
|||
| ----- | |||
| October
4th - Painting Again |
|||
| The
left side chisel marks were filled first thing to give them time to dry
and be sanded later in the morning. A heater in the garage helped to
raise the temperature to speed up the drying time. As soon as the filler
was sanded, it was given a prime so that could dry ASAP. |
|||
| Amongst all that, the coach bolts arrived in the post, so I'll now be able to get on finishing the fender repairs. The filled areas looked better with the thin coat of filler, so I was happy to go ahead with the olive drab again. To give a little extra drying time, I started on the other side of the tailgate and the rear of the truck which hadn't been filled. The second coat of paint went on well and gave a more dense finish, where as the first coat was a bit thin in places. | 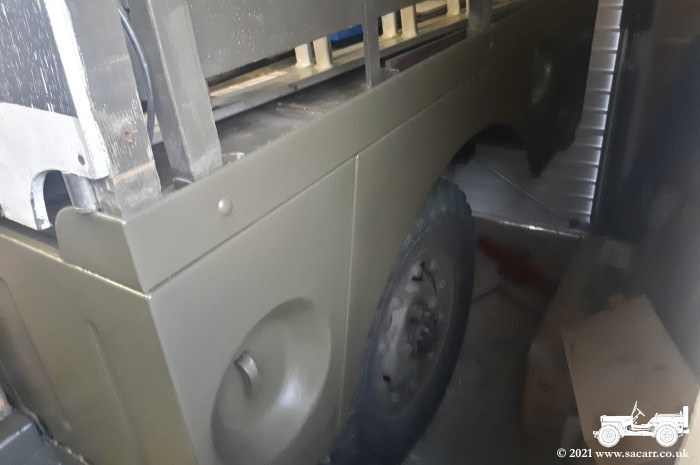
|
|
|
| The second coat was also drying with a more even satin finish despite stirring the paint the same and applying it in the same way. I don't mind a slight satin finish as I have wartime pictures showing the darker late war paint being satin. If it is a little too glossy still once complete, I'll let the paint harden a couple of weeks and give it a light scuff with a scotch pad or fine wire wool to take any excess sheen off. Once the olive was done and left to dry, I took the radiator grille and lamp guards into the workshop to prepare for paint. The grille needed the second side painted with primer while the light guards needed the white stripping off and priming. |
|||
|

|
|
|
| ----- | |||
| October
5th - Fender Repairs Complete |
|||
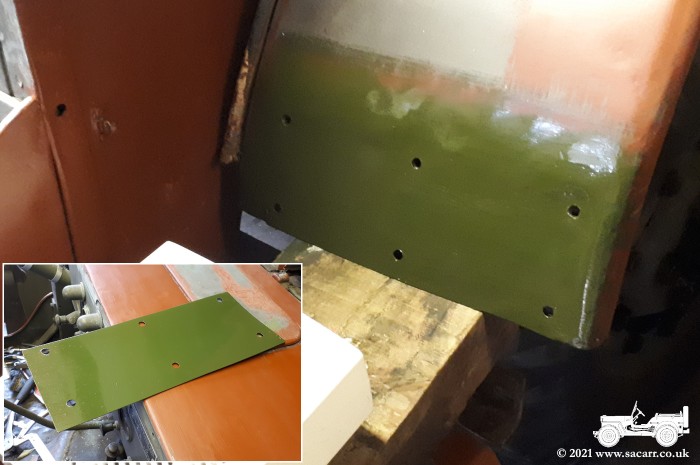
| The
day was interrupted a bit by having an electrician doing some work in
the house, but my day's work was focused on the fenders and the doubling
plates. The bolts arrived the day before and most of the pieces of metal
had been primed or painted. The first job was to fit a square peg in a
round hole! The coach bolts have a square collar just under the head and
I needed to file the holes in the doubler, fender and hat channel to
match so the bolt would fit fully flush. I had several square files, but
only a short one was small enough to fit in the hole. It took quite some
effort to file out all twelve holes through the three layers of metal,
but eventually all the bolts fitted.
The edges of the doubling plates
were then tweaked to close up the gaps to conform to the fender shape.
On the left side, the hat channel threads and its bolts were quite
rusted, so all were cleaned up and re-threaded with an imperial tap and
die set. The left side doubler hadn't been primed on the outside, so
that was done before lunch and left in my curing cabinet to harden a
while. |
|||

|
|
|
|
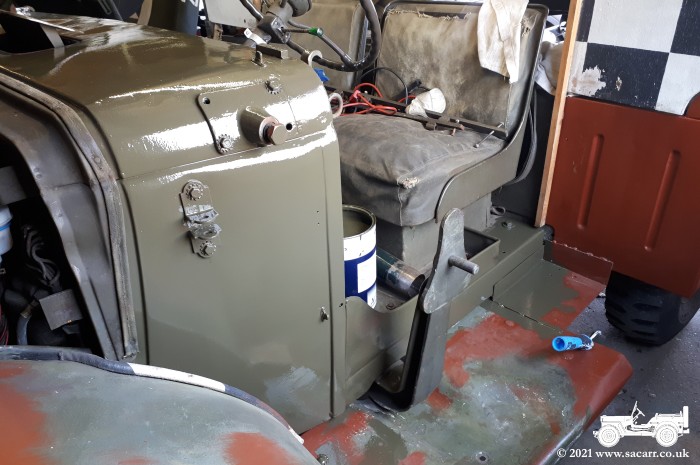
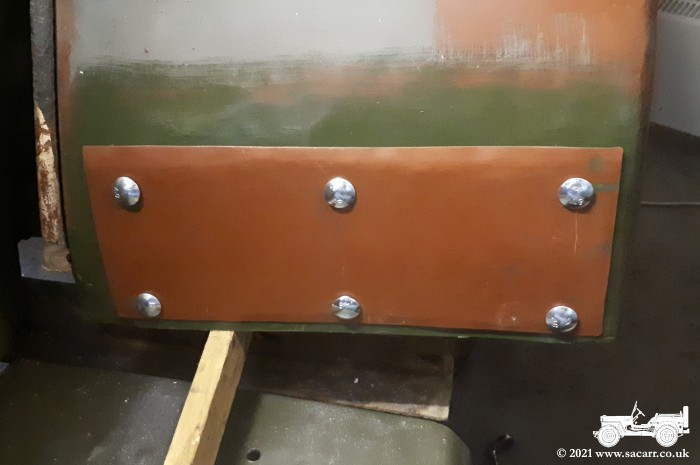
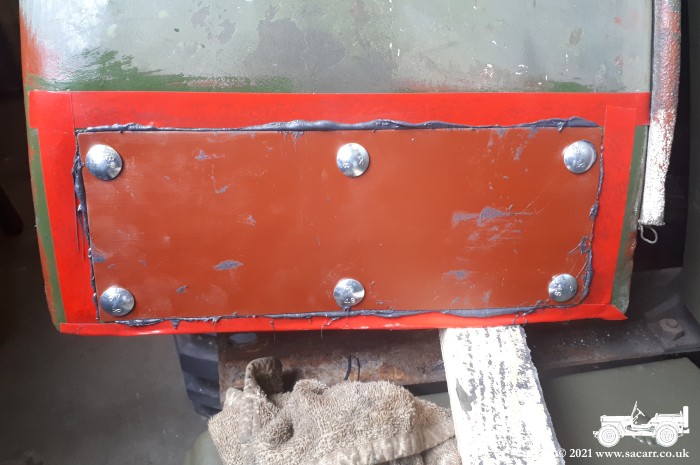
| The mastic came next. Incredibly sticky, stringy stuff that got all over my hands, so no photos were taken until I got cleaned up again! I put insulation tape on the fender around the doubler to contain the mastic where it squeezed out when the bolts were tightened. Excess was wiped away with tissue paper and white spirit and then the tape peeled away, leaving a fairly neat edge. The heads of the bolts were given a splash of primer and the job was done and most of the day was too! I finished up cleaning and priming the depressions and fittings where the headlamps fit and giving them a coat of primer and filling some more dings and scratches in the tops of the fenders. They should be ready for a quick sand tomorrow and then receive their first coat of olive drab, along with the grille and headlamp guards. |
|||
|

|
|
|
| ----- | |||
| October
6th - Fender Painting and Stripping the Screen |
|||
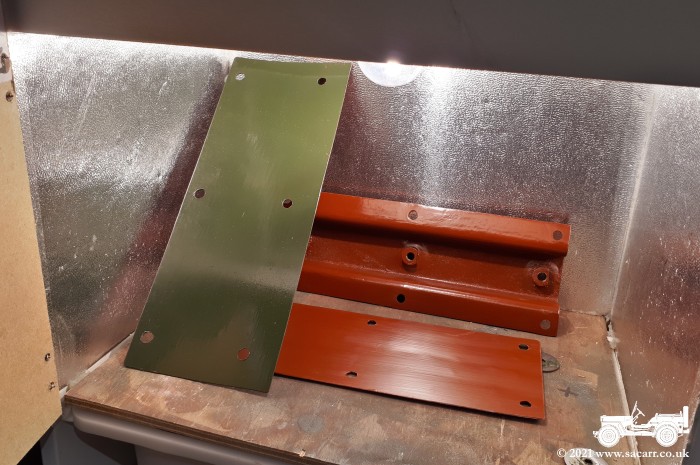
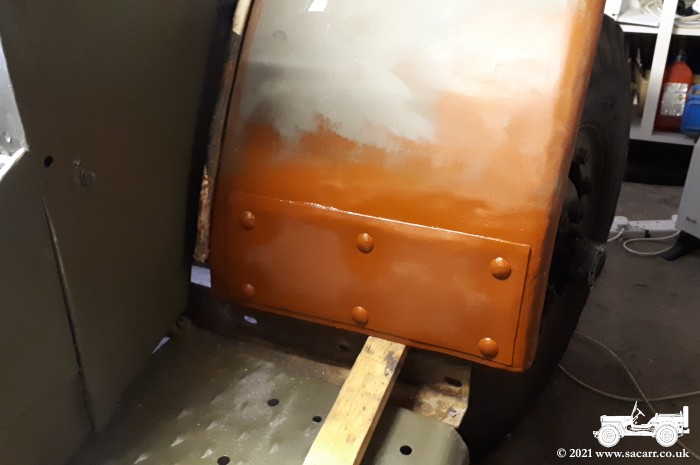
| I started off in the workshop today, cleaning off the rust from the bolts for the lamp guards, then took the bolts, guards and the grille to the garage ready for painting. It took a while to warm the place up, but I had the filler on the fenders to sand while I was waiting. The fenders were painted and while there was paint on the brush and roller, I went around most of the truck again for another coat. I couldn't paint everything however. | 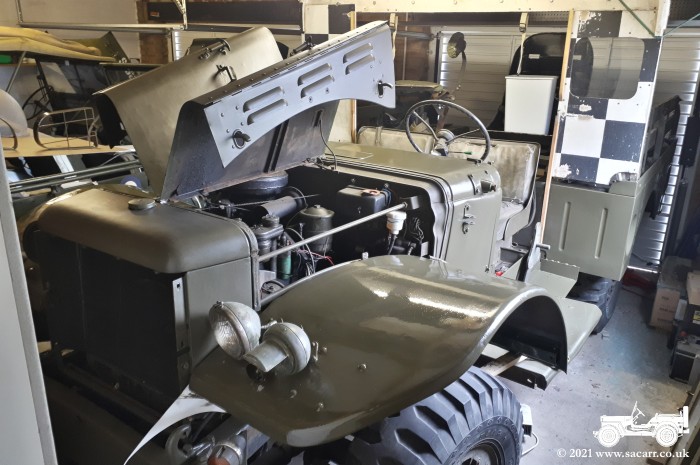
|
|
|
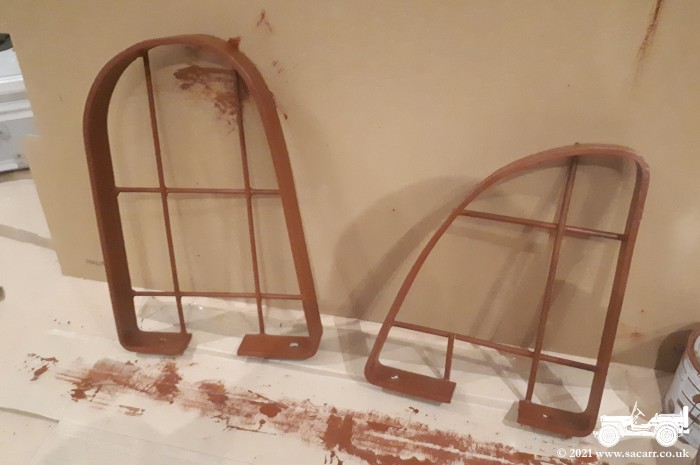
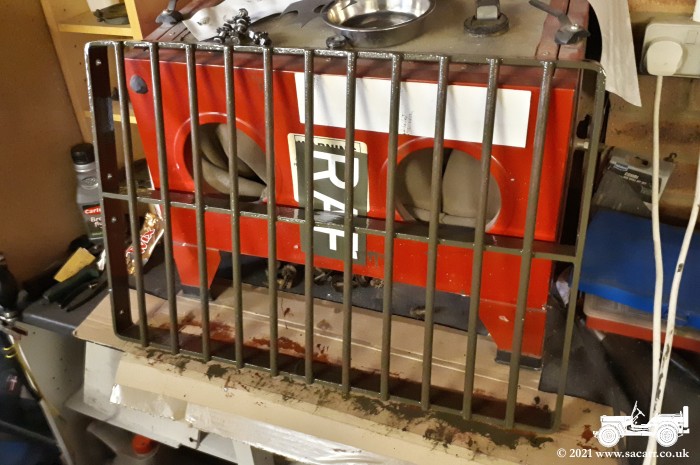
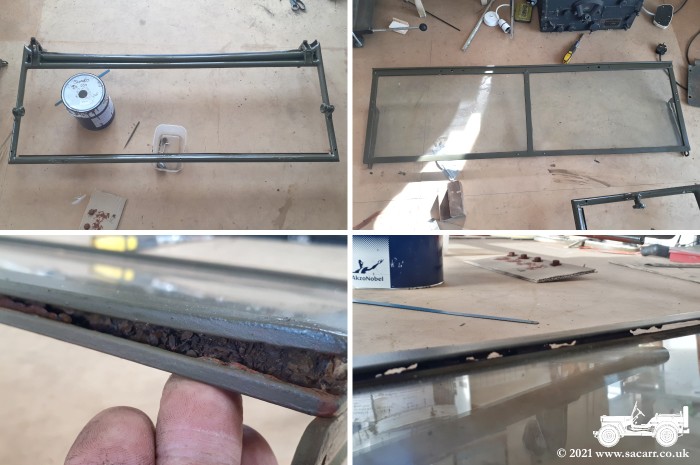
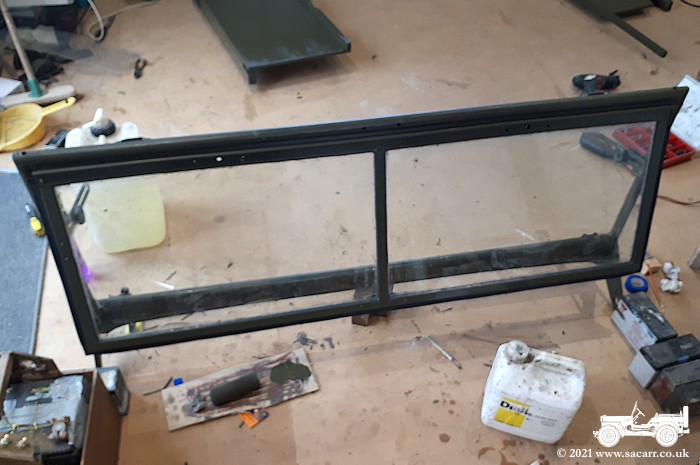
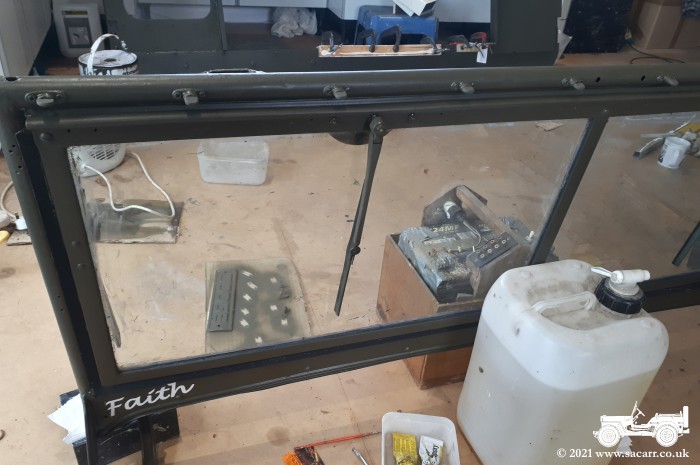
| The fenders were resting on blocks of wood, which in turn were resting on the steps; so the steps couldn't be painted. The two sides of the hood were also left open and out of the way and the front bumper wasn't painted as I was doing lots of walking passed it. Most of the grille was painted by painting the back first, then leaning it against my sand blaster to do the front. The lamp guards and lamp mounts were painted on a piece of card resting on top of the Ford. With everything drying, it was time to move on to the windscreen which was in the workshop. | 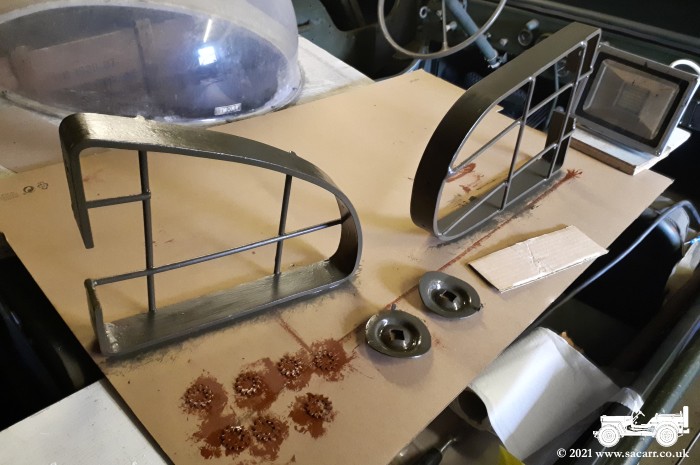
|
||

|
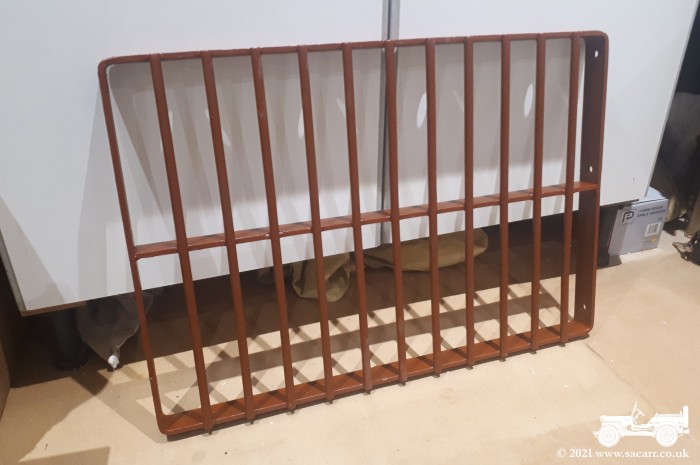
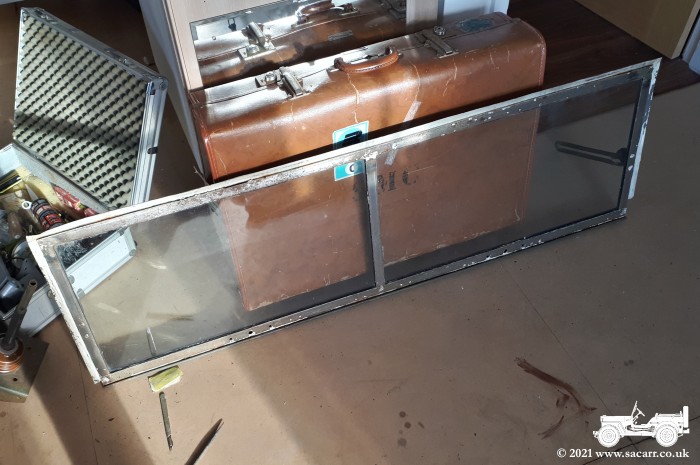
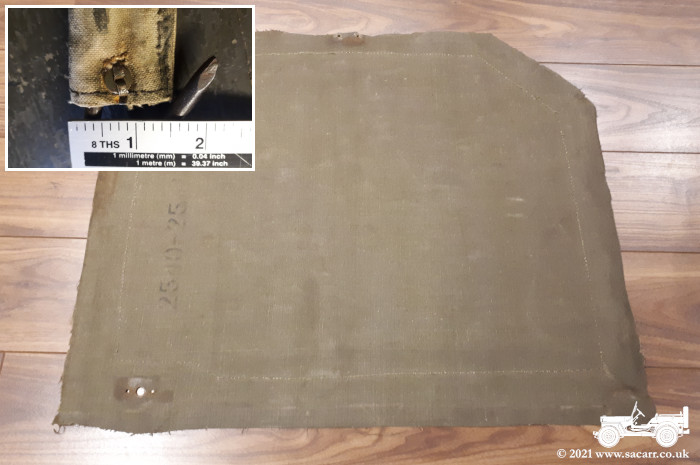
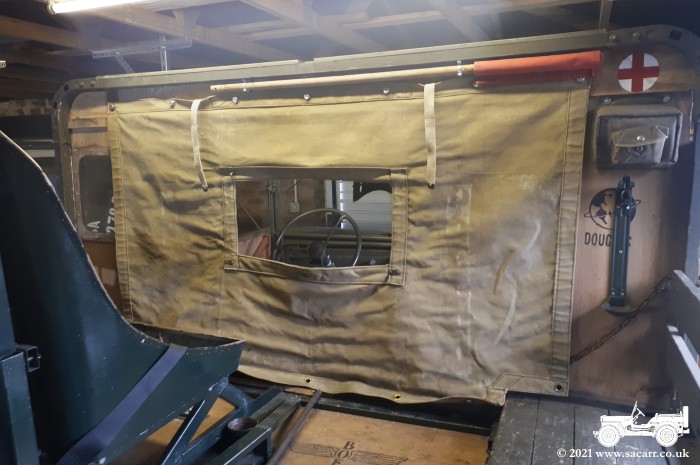
I began by stripping off the various accessories such as the vacuum wipers, mirror and the canvas fasteners. With those out of the way, the inner screen was separated from the outer and set to one side. I started work on the outer. There wasn't many layers of paint on it, just the white, one coat of olive and primer. There were a few patches of rust that looked bad, but once gone over with the rotary wire brush, the whole screen frame came up looking very clean and new. I'm wondering whether the outer frame has been a replacement. Almost all of the outer frame was stripped to bare metal, except on the inside between the two tubes where it would be difficult to access. They looked in good condition anyway, so were given a light sand to provide a key for the new paint. | ||
| The inner screen wasn't touched today, but initial looks suggest it is a little worse condition than the outer. Water appears to have got between the rubber seal and frame, causing rusting which is pushing the frame out away from the glass. I'll get some more olive on the truck tomorrow and then have a look at the inner screen. |
|||
|
|
|
|
| ----- | |||
| October
7th & 8th - More Painting |
|||
| October 7th & 8th - To look at it, it appears that progress on the Dodge has slowed down, when actually it hasn't. It doesn't change much for another coat of paint, but it's all steps along the way to completion. Most of the main bodywork of the Dodge has now had four coats of paint, with a few parts such as the fenders, tailgate and steps at two to three coats. |
|||
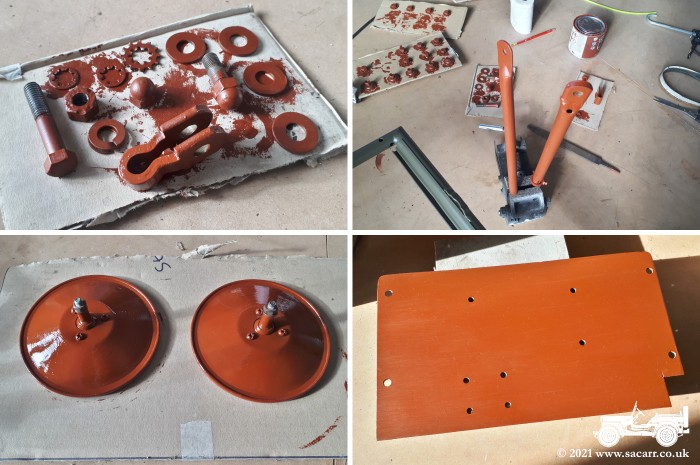
| On the 7th, after another coat of olive drab on the Dodge, including lamp parts, grille and lamp guards, I moved on to the inner screen frame. It was stripped to bare metal and was red oxide primed both sides along with the outer frame. It was in a poor condition in places due to water trapped behind the rubber seal that holds the glass. I think I can make it last a while longer, but eventually it will loose its fight against the rust. All the grille, lamp guards and fender bolts were cleaned up and primed which took a while. | 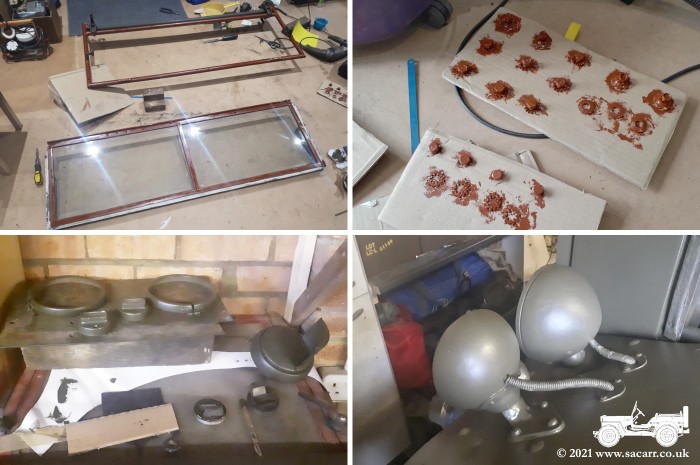
|
|
|
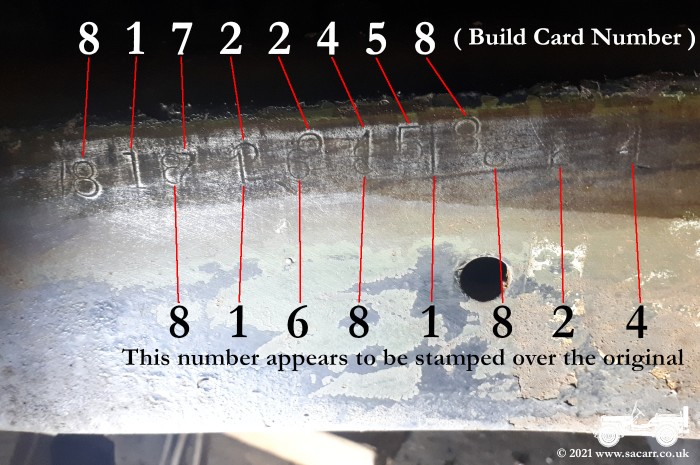
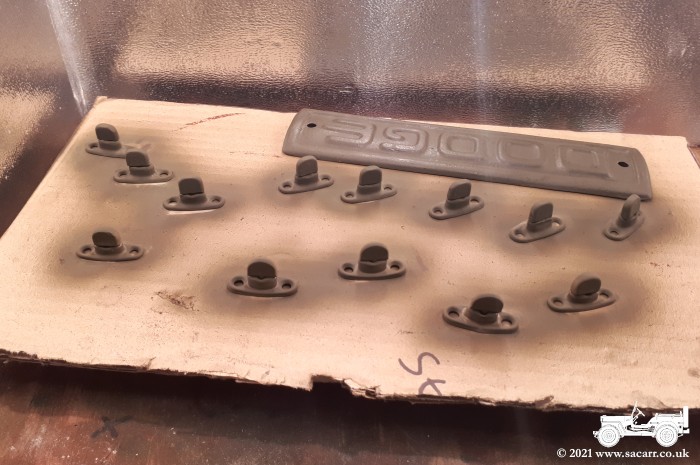
| On the 8th, the frames were painted olive drab on one side. The photos show the rot in the inner frame now the inner to outer rubber seal has been removed. It had been rusted into place, but I managed to free it today. After the inner frame is fully painted and dry, I'll look at reinforcing the frame, possibly with epoxy and using silicone to seal the glass to prevent further water ingress. Both mirror arms were stripped and primed today, more olive drab on the Dodge, all the bolts so far removed had their threads re-cut and the steel plate over the front right locker was primed on the outside. I have also been investigating the chassis number. The original build card from Dodge shows it to be 81722458, built in August 1944. However, a closer look at the stamped serial shows a second number, in a slightly smaller font, which appears to have been stamped over the original number. |
|||
|
|
This number is 81681824, which according to one file I have, was from May 1944. I don't know if this was stamped during the war, or post war in Norwegian Army service when I know the Dodge had a rebuild. It all started trying to track down the original US Army hood registration number, based on the chassis number and build date. I've narrowed the number down to a range of 173 vehicles using the August 1944 build card serial. I think I'm going to have chose one from the range between 81694364 to 81694537. |
|
| ----- | |||
| October
9th/10th - Stencils and Markings |
|||
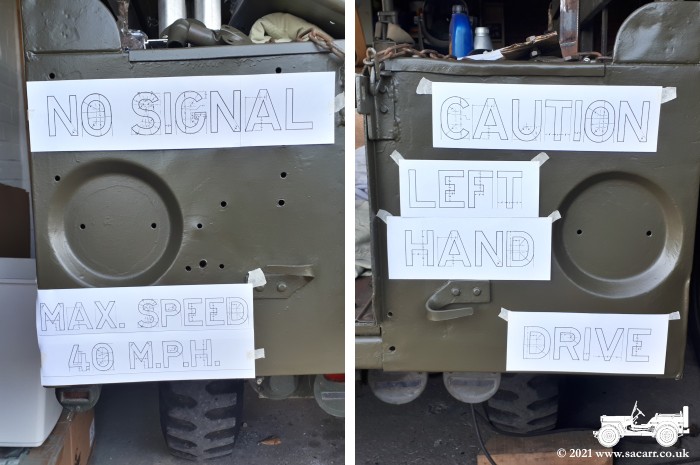
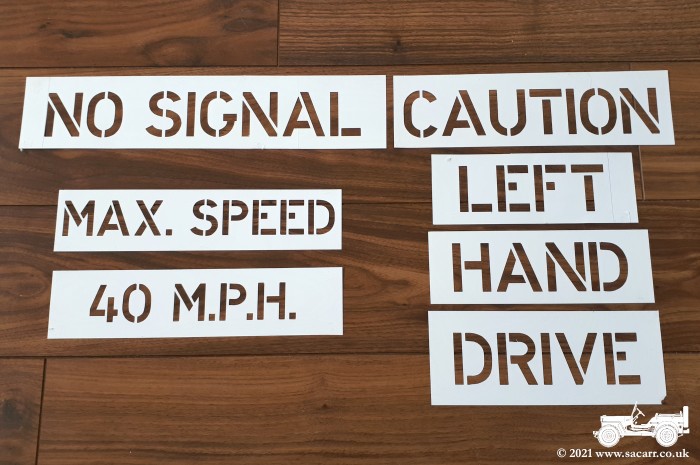
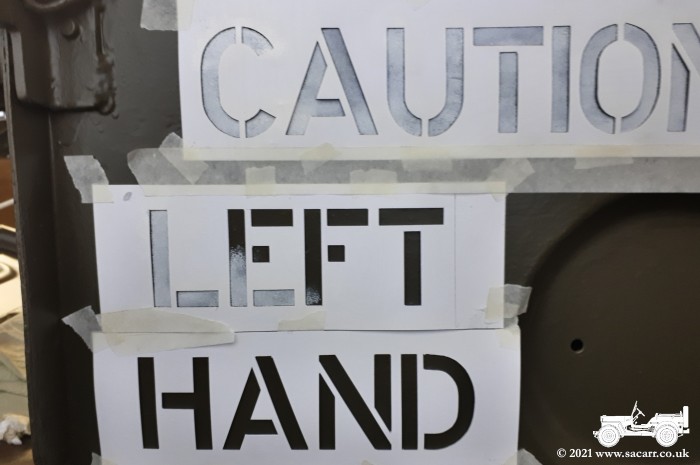
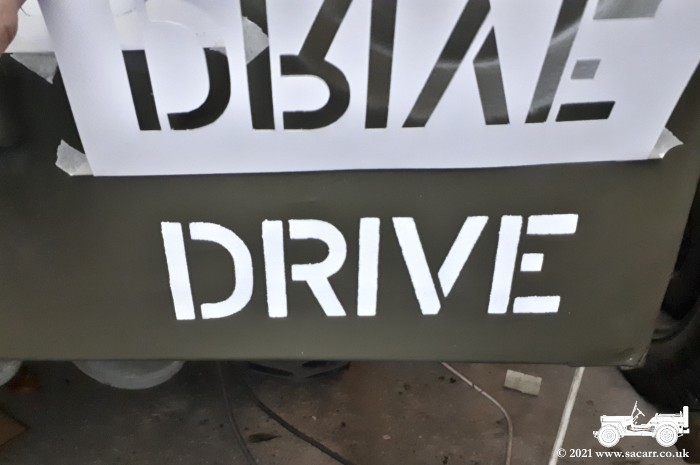
| More painting of smaller green bits on the 9th; the screen frames, mirrors and arms, some bolts and the inner screen stays for when it is open. I also started
trimming un-needed pieces of wood from the framework attached to roof bow number one. There was some slight delamination of the ply which also needed gluing. While the paint was drying on everything, I then started on the graphics for the stencilling. A few test prints were made to check the sizes against the space on the Dodge and all seemed good. The paper prints were tack glued to some thin card and out came the scalpel for a few hours cutting. Not all the stencils are made yet, there's still the Left Hand Drive and No Signals for the back. |
|||
|

|
|

|
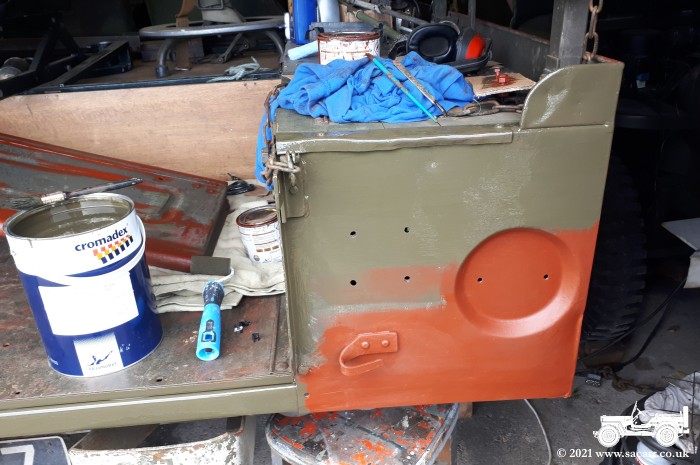
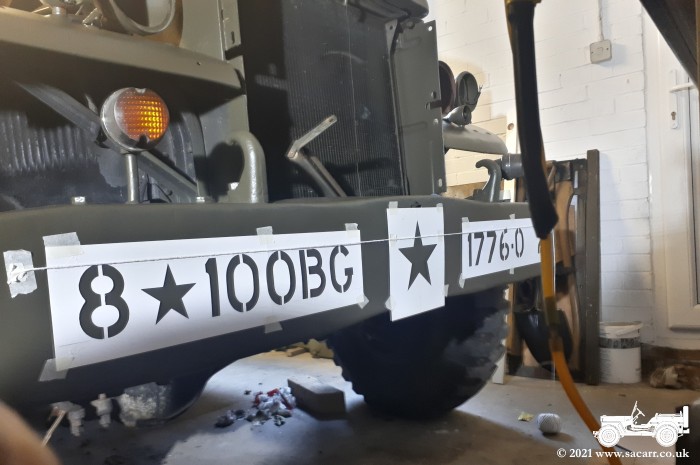
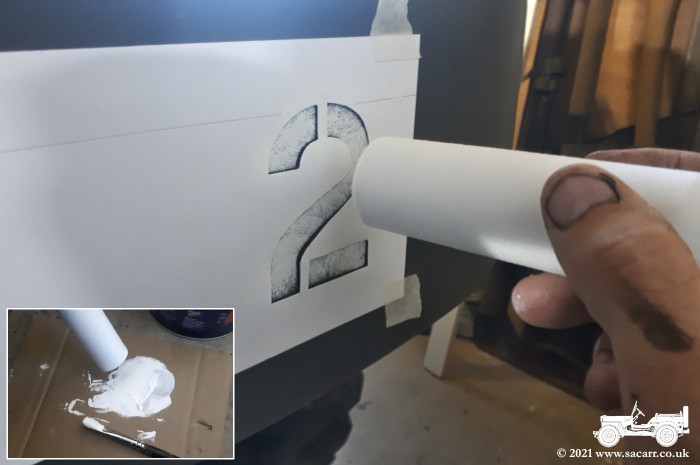
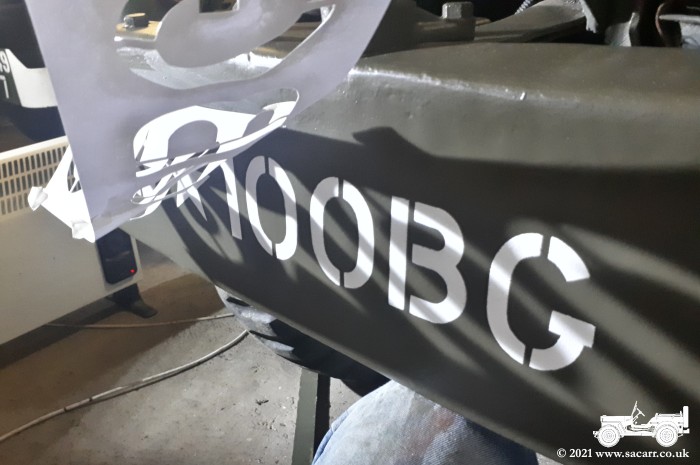
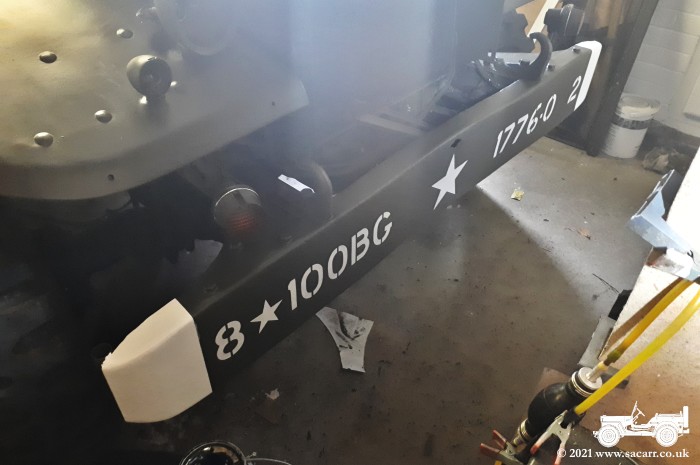
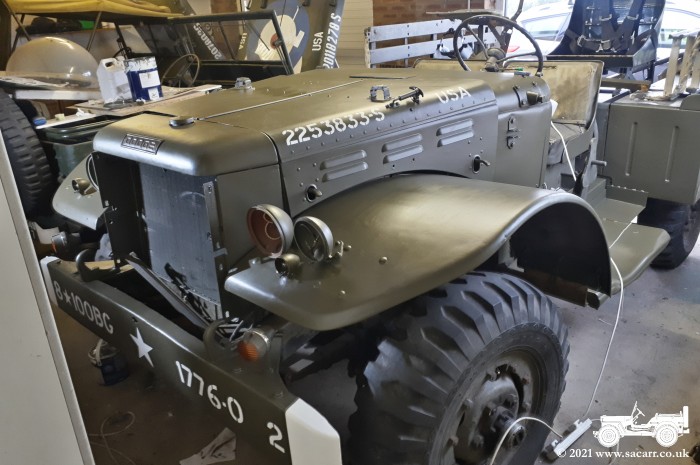
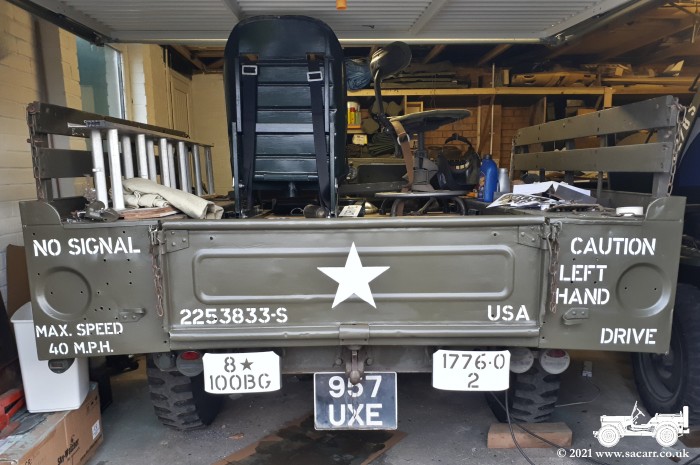
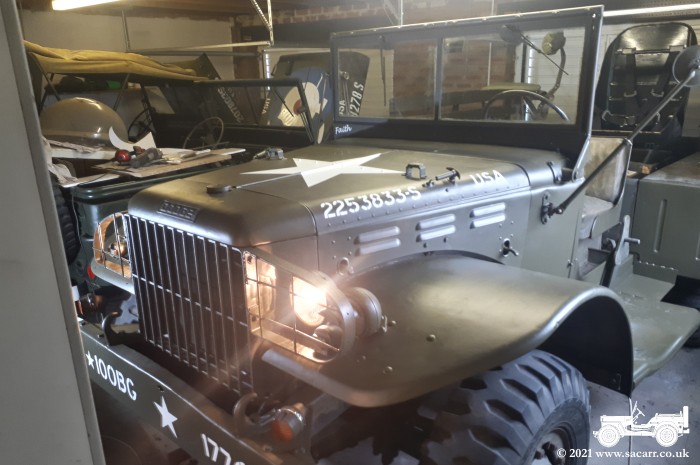
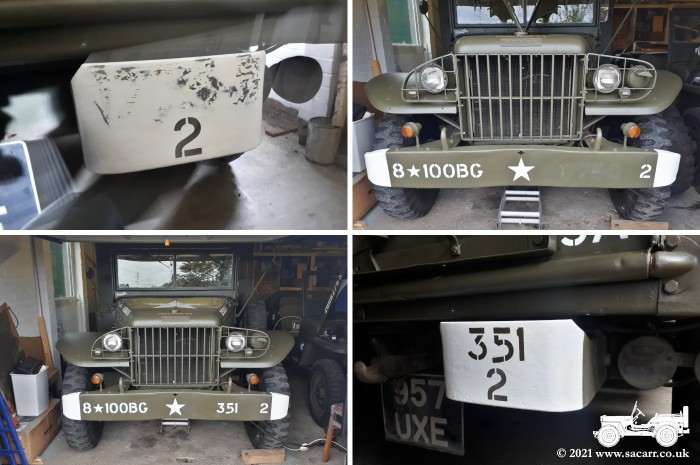
| I started on the front bumper. The Dodge's new identity is still with the 100th Bombardment Group to match the rest of the fleet. Partly inspired by the Ordnance Depot Jeep markings, I checked up on the 100th BG website and found the ordnance unit there was the 1776th Ordnance Company. This gave me the new bumper markings of "8 * 100BG 1776-O 2" - 8th Air Force, 100th Bombardment Group, 1776th Ordnance Company, Vehicle 2 ( vehicle two simply because the Dodge was the second military vehicle I bought ). The stencils were masking taped in place and the paint applied with the end of a 4 inch glossing roller; dabbed on. The paint was painted onto card first, then the roller dabbed onto the card to pick up some paint without overloading it with paint. After the bumper markings had been given around three thin coats, I painted the white blackout markings on the tips of the bumper. |
|||
|
|
|
|
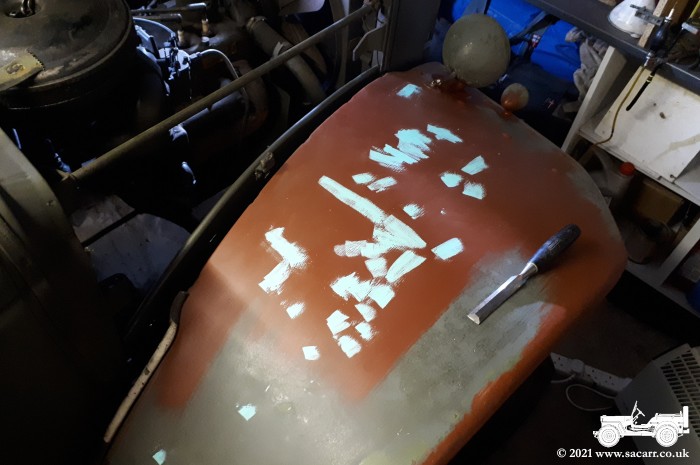
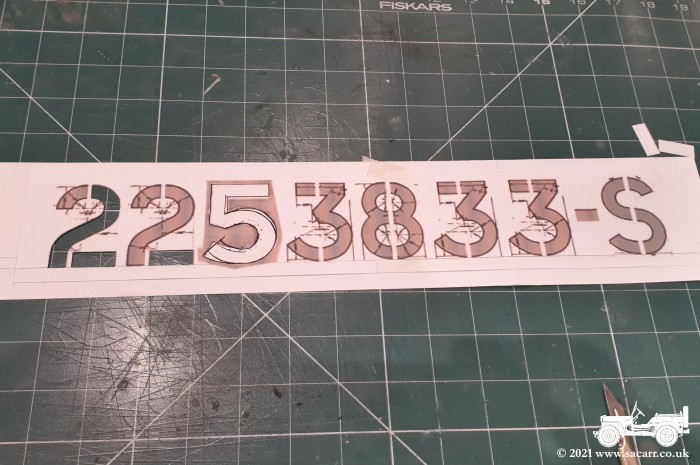
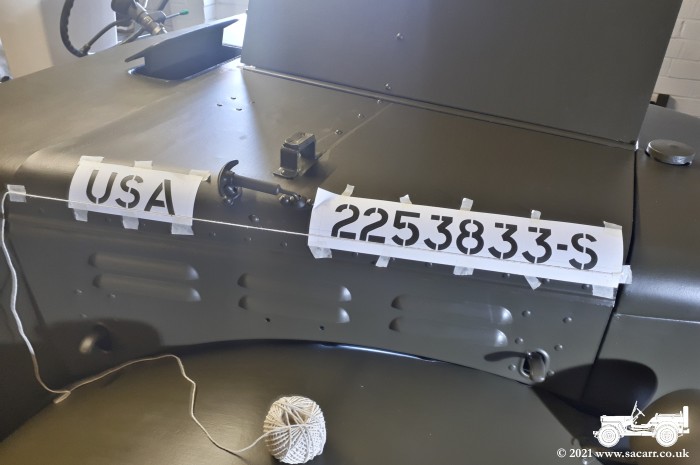
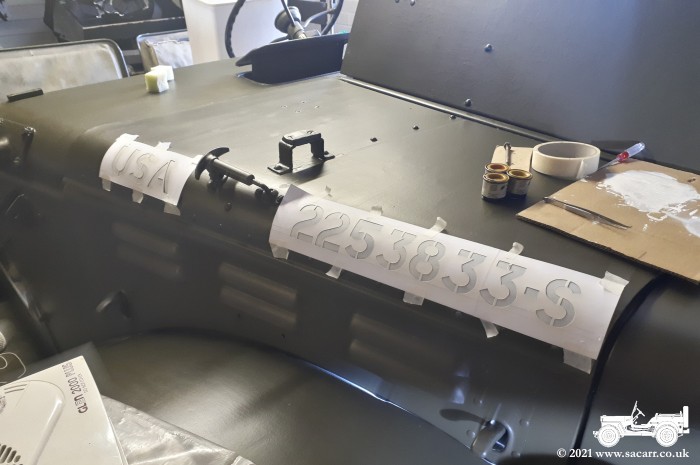
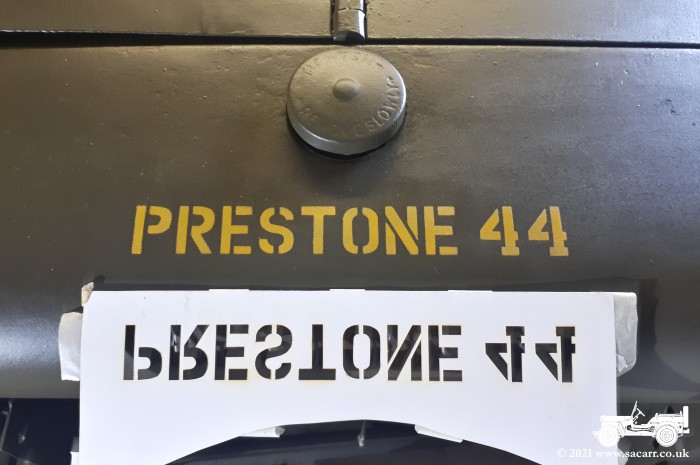
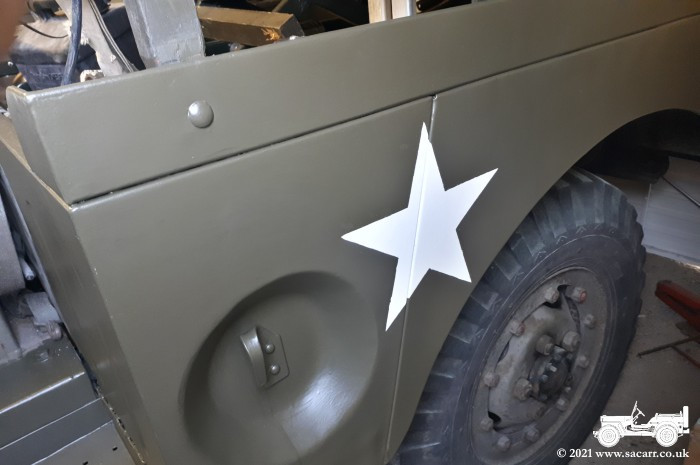
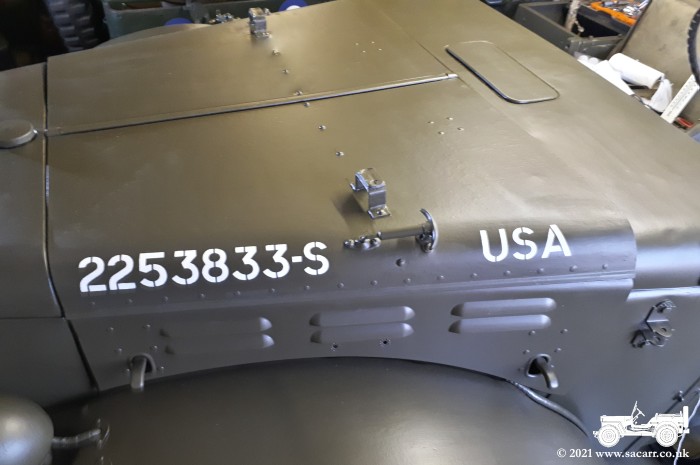
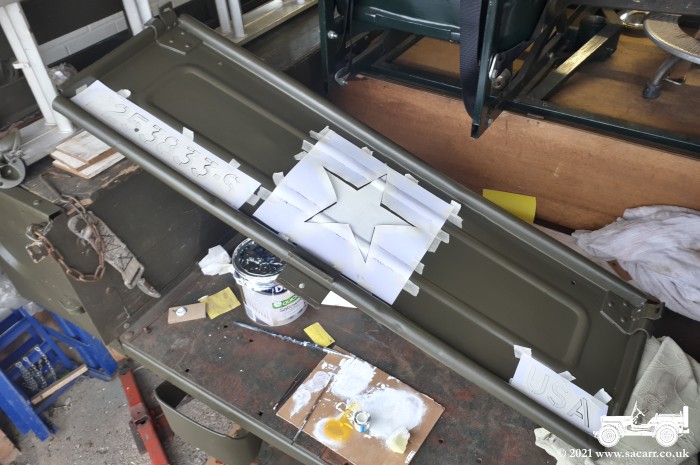
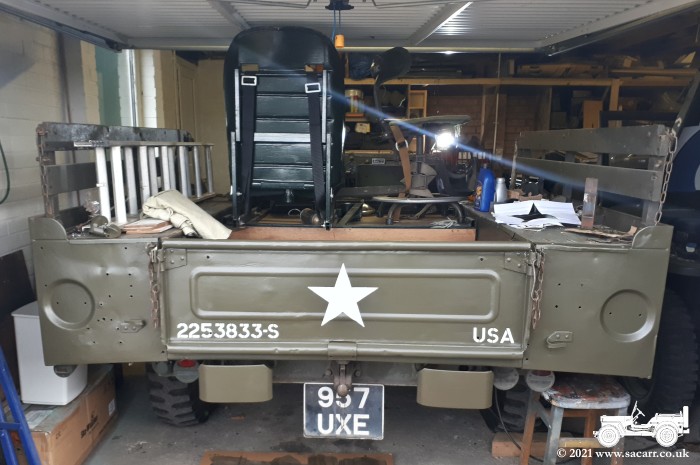
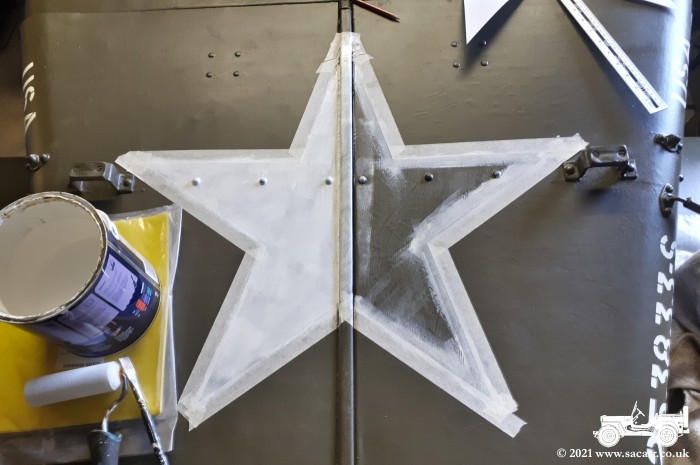
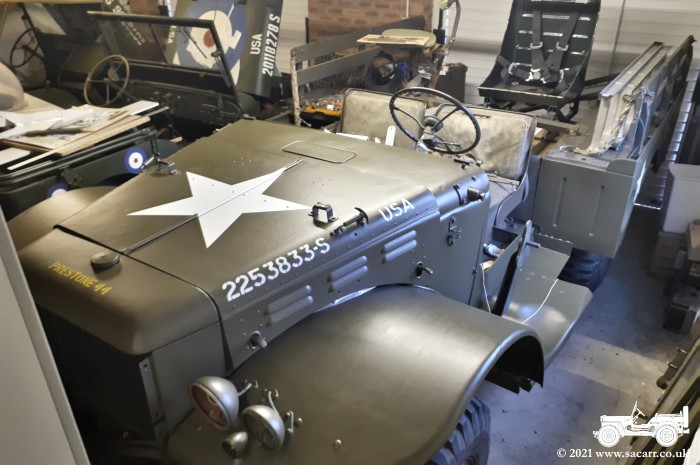
| The Army registration on the hood was next. Research showed I had a range of 173 possible vehicle numbers, based on the chassis number. It lay somewhere between 2253695 and 2253868, but there was no way to be sure. When I was sanding the bumper down, I found a number ending in 833. I don't believe it was the original number, but it fitted into the range I had, so my stencil was cut to give 2253833. While the first hood number was drying, I moved to the front for the Prestone marking. Prestone and a year was a sign the vehicle had received antifreeze and the year added. I still had the stencil from my first Jeep and reused it on the Dodge. Co-incidentally, the Dodge coolant system is still using Prestone antifreeze. Amongst all this, the rear body side stars were added. |
|||
|
|
|
|
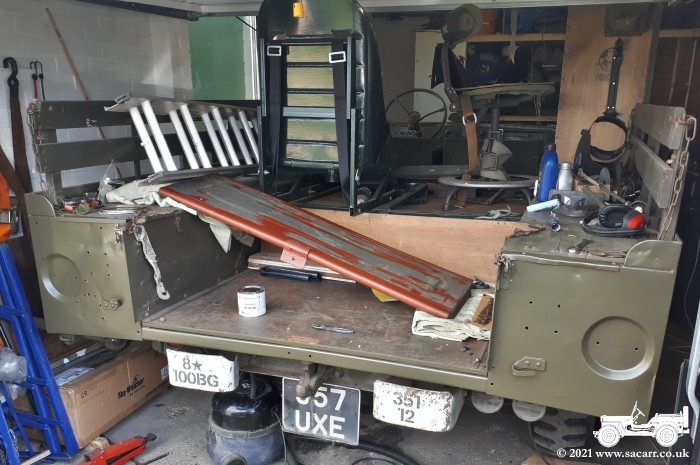
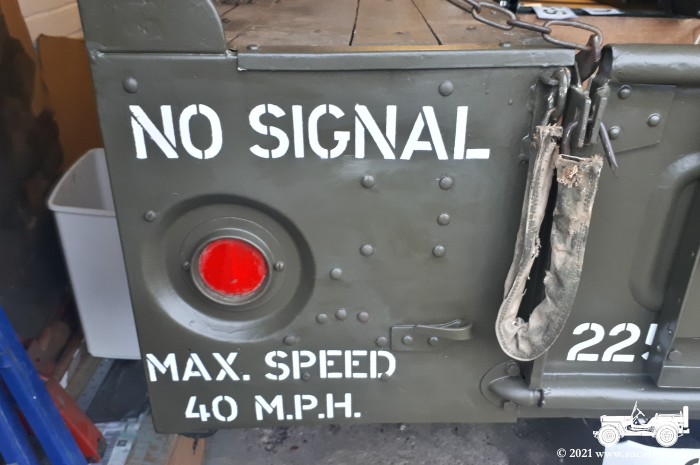
The last stencilling for the day was on the tailgate. The irony is that most of it will be hidden behind the Pioneer tool rack when it is refitted, but parts of the stencils will be visible. I'm very pleased with the new look and new identity. I can see some additional ammunition crates being made in the future to fill out the back of the truck. The rear bumperettes need painting while then receive their stencils. After that, it's the hood star, no signals and LHD stencils to add, plus the name repainting once I've finished painting the screen. It all needs a while to fully harden before I start bolting it all back together, so in the mean time, I'll continue with the front roof bow wookwork. |
|||
|
|
|
|
| ----- | |||
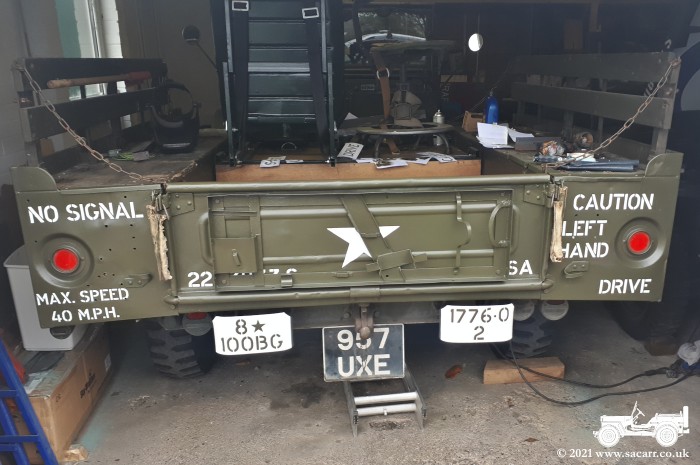
| October
11th - More Stencils and Markings |
|||
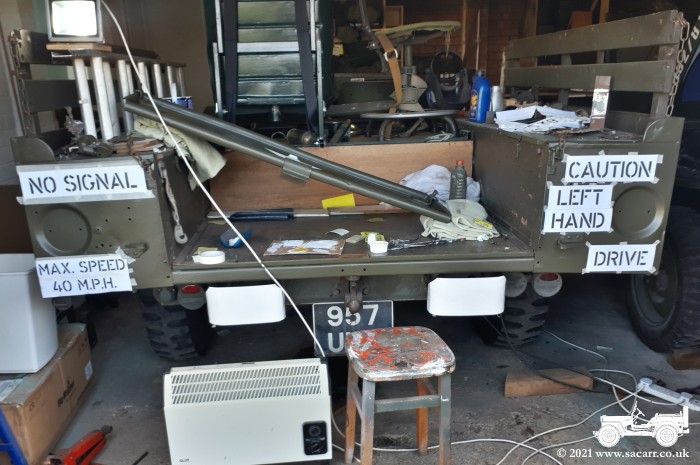
| I
took some measurements of the rear panels yesterday to estimate some
sizes for the stencils. I printed the samples and took them to the Dodge
for a test fit. All seemed well, with them all fitting around the
reflector depressions and roof canvas rope hooks. The print outs were
then tacked to thin card and the stencils cut out. Back out to the Dodge
and it was moved forwards in the garage about 18 inches, so I could work
behind it with the door shut, as it's getting really cold now. The
bumperettes were then given a few coats of white for their blackout
markings. The stencils were taped in place and the painting began. Three
thin coats applied with a piece of sponge foam was enough to give a
reasonable coverage. |
|||
|
|
|
|
| The drying time was shortened due to the thin coats and a fan heater to speed up the drying between each coat. It wasn't long before I was able to peel off the stencils. I then came back indoors to make a paper template for the hood star. Back out again to mask it up for painting. I didn't have any card big enough for a star stencil and the central hinge and proximity of the screen rests resulted in masking being the easiest option. It was brush painted like the truck itself and while wet, I went over with a small glossing roller to take out the brush marks. With the hood star drying, I went
back to the rear of the truck and attached the unit marking stencils to
the bumperettes. They were then painted olive drab with the sponge
method. The tailgate was hooked back on for another rear end shot
looking pretty much complete, but for the pioneer tool rack. Around the
front of the truck again and the white had cured enough to remove the
masking tape. That's all the markings complete, but for the name on the
screen. |
|||
|
|
|
|
| ----- | |||
| October
12th - Windscreen & Roof Bow |
|||
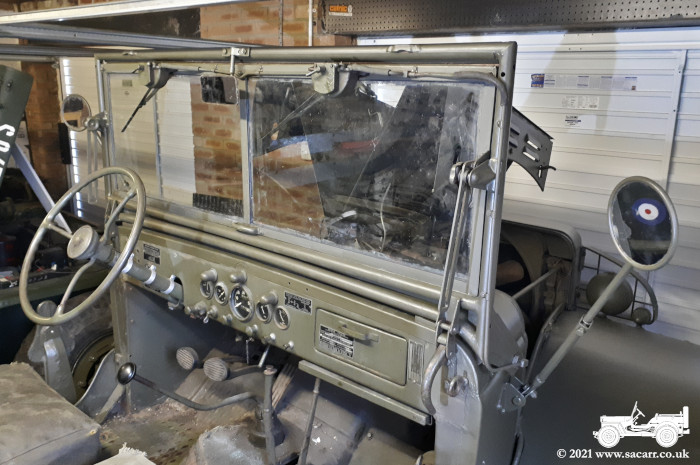
| I
spent quite a bit of the day cleaning rubber but started off
reassembling both the mirror arms now the paint was dry. Both of the
rubber screen seals, the one on the main frame and the opening section,
had been overpainted in olive drab followed by black and white from its
flying control days. Both rubbers were quite stiff as a result, which
probably didn't help them to do their job as intended. |
|||
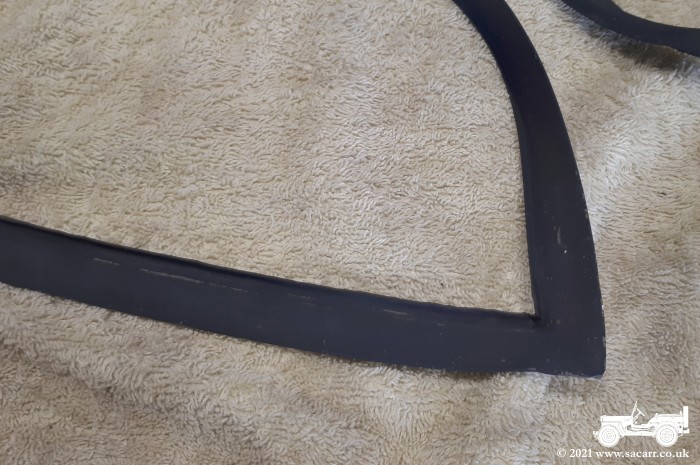
| The inner screen seal was sanded with 240 grit wet and dry paper over the sink, gradually breaking through the paint until I reached the rubber. It took a while, but as can be seen from the second picture, it came up very well. Looking for a faster method for the main frame seal, I ended up scrubbing it with fine wire wool, lubricated with cellulose thinners. The thinners helpded to soften the paint while the wire wool scraped it clean. That also cleaned up well. | 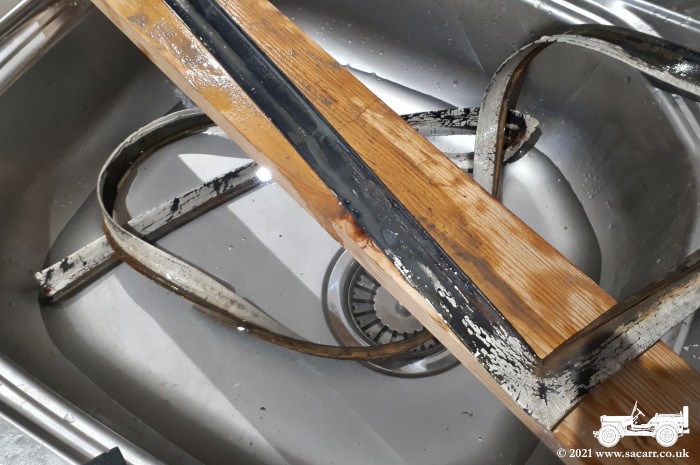
|
|
|
| Once clean and dry, I refitted the inner screen rubber to the frame and then used the left over mastic, squirted into a small syringe, to pump it into the gaps around the seal and frame. Hopefully this will keep the water out. Because the rust has already started to force sections of the inner screen apart, just fitting a new glass seal was never going to be a solution to keeping the water out. Masking tape was used to keep the seal still to stop it twisting to one side or the other while the mastic dries. I then used a scalpel to cut out much of the original rubber glass seal, long since hardened and gone brittle. This left a small 'V' gap between the frame and glass where I added more mastic to stop rain water getting into the frame next to the glass. All the edges are done but for the bottom. |
|||
|
|
I'm waiting for the current mastic to cure before I turn the screen the correct way up. With the mastic sealing the bottom where the rubber seal is, I should be able to pour some epoxy and possibly some milled fibreglass fibres into the rotten area of the frame to reinforce it and keep water and oxygen away from the already badly rusted internal structure of the frame. It should give the frame a few more years of life without complicated welding repairs. | |
|
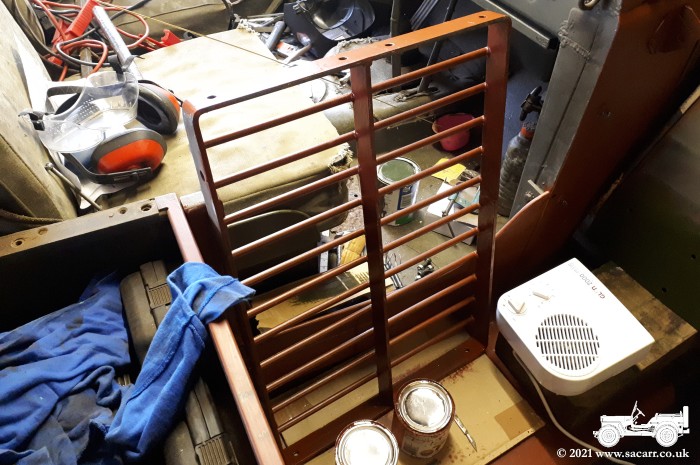
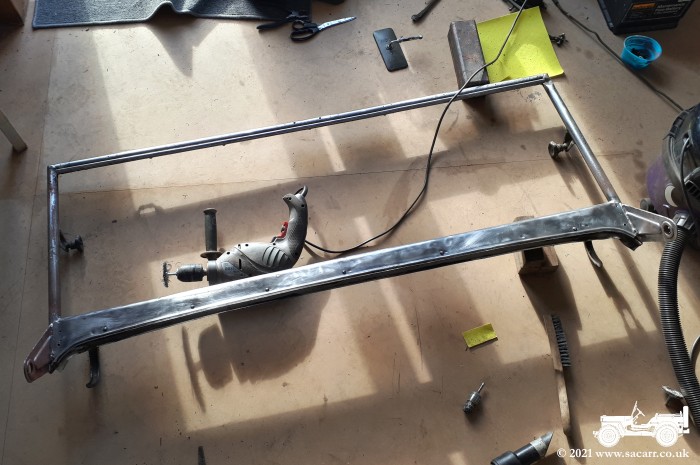
I also started painting the roof bow and wooden frame behind the cab. There were a couple of areas that needed some filling where other wooden parts had been removed. That was going to take a while to dry, so I left that to set and painted a first coat on everything else. I can catch up on the patches with a quick sand and early coat of paint in the morning, then probably the whole thing again later in the day. |
|
|
| ----- | |||
| October
13th/14th - Windscreen & Roof Bow |
|||
|
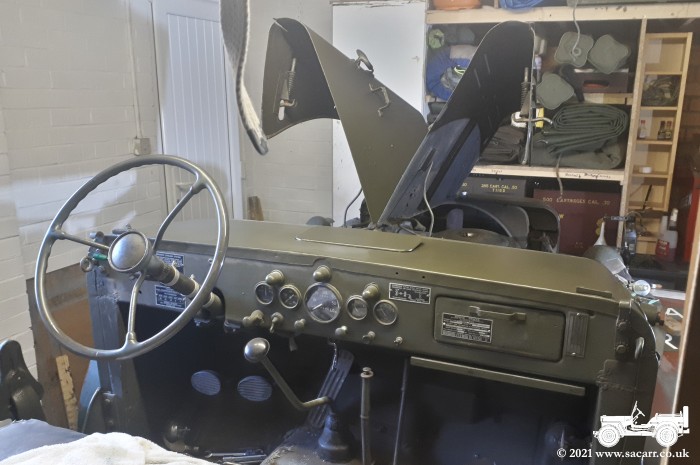
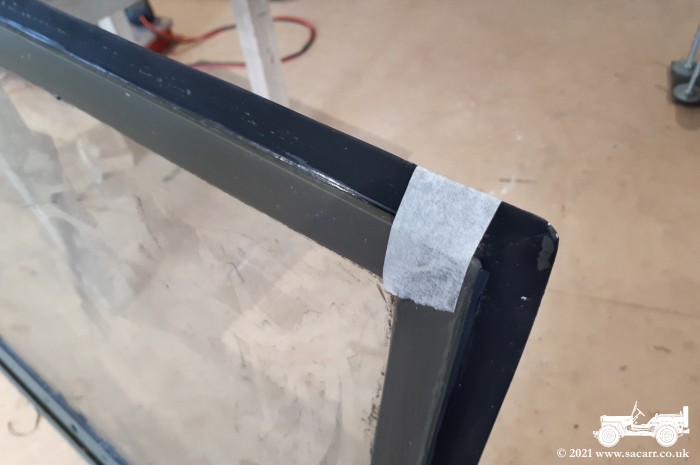
The bow frame was painted olive again on the 13th and set aside to dry. I then turned my attention to putting the screen back together. Like the Jeep screen, the design of the Dodge is the same, with the inner frame opening to 90 degrees to slide in or out of the outer frame. Two interlocking curved pieces of metal form the hinge. When everything is new, that's how it's meant to work and sometimes it's a bit tight. The Dodge was at the other extreme. The screen slipped into place very easily and I'd greased the joint to be sure, but I'd just got it into place and it fell out! | ||
| I
think the two curved interlocking pieces of metal that form the hinge,
have been over extended at some point in the past and have opened up a
little. This was allowing the inner frame to drop out of the hinge slot.
I'd get one end in and the other would drop out before I had time to
close the inner screen so the hinge closed up more. Eventually with lots
of huffing and puffing and some blocks of wood to support the frame and
stop it dropping while I fought with the opposite end, I got it together
and closed. I was able to stand the frame up the correct way to allow
gravity to fill the rotten part of the frame with epoxy resin and milled
fibreglass fibres and finally, mastic to seal the remaining glass joint.
With the frames together again, it gave me the space available to work
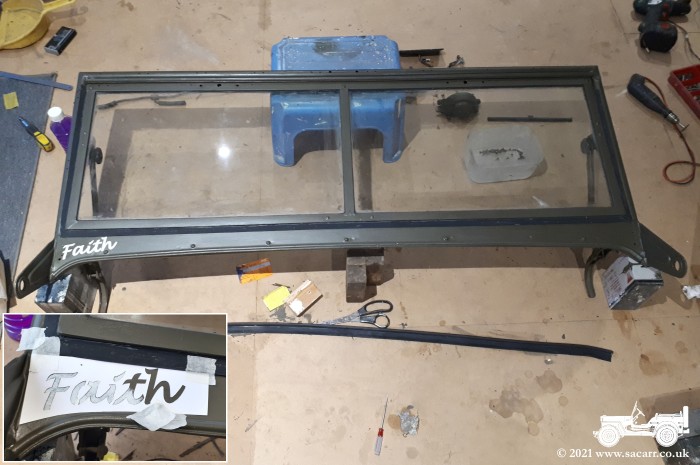
out the stencil size for the name to be painted back on. |
|
||
|
|
All the little canvas fasteners were soaked in cellulose thinners which brought all the old paint off and they were then repainted and left to dry in my curing cabinet ( basically an insulated cupboard with a halogen bulb ). A stencil was cut for the name, in the same font as before, but in bold rather than standard. With all the checkers on the old Dodge, the name was lost a bit in the glare of the contrasting black and white. Now in white on an overall olive truck, it is probably more noticeable. | |
| I'd noticed that the ply on the cab bow was delaminating in places. So on the 14th, the frame was inverted and a ton of PVA glue run into all the laminations before clamping it to dry. It was only cheap shuttering ply, rescued from a skip in 2008, so it's done quite well. Once fairly dry, a few short screws were added to keep the laminations secure, so the clamps could be removed and the wood painted again. This was the third coat of olive drab, as the previous checkers were still visible at two coats. It darkens a little as it dries, so I'll see tomorrow how it looks. |
|||
| Re-assembling the screen accessories was next, the canvas studs, the vacuum wipers etc. The splines on the wipers were almost non-existant, so a little epoxy was added to help secure them. From the looks of them, they'd been glued before. All the canvas screws vacuum hose screws and wiper motor bolts were then touched up with olive. The rear view mirror had just been held in place by a bent strip of metal, clamping the mirror arm against the screen. | 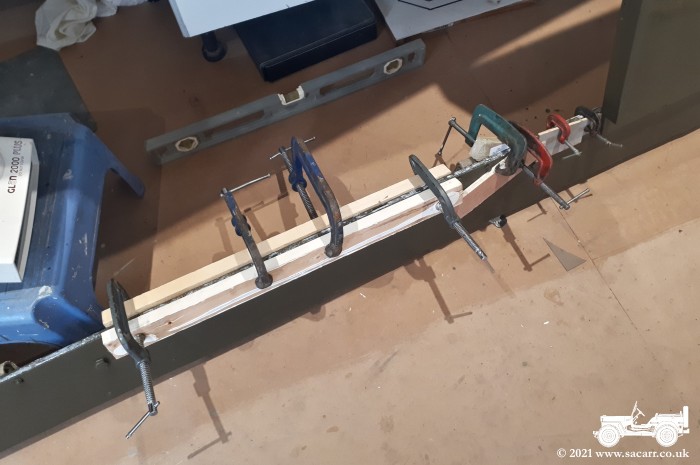
|
|
|
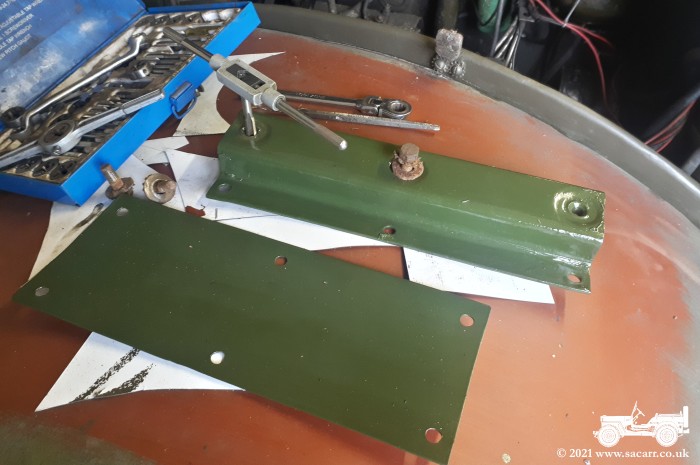
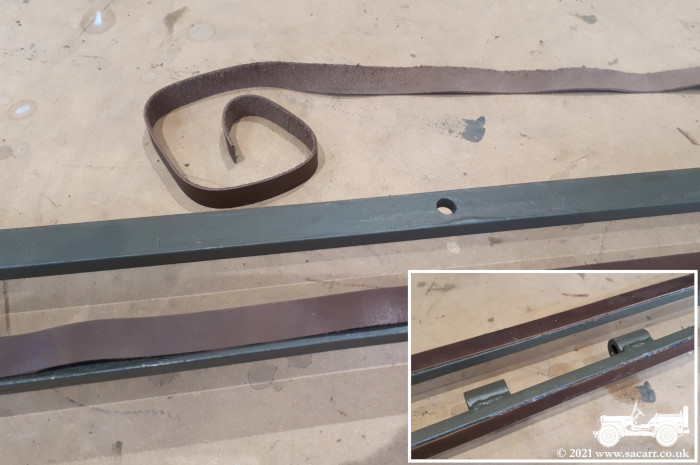
| It's been like that since I got the truck, but I welded up a new bracket which would clamp the mirror more securely and bolt into the same holes in the screen. The tailgate was bolted back onto the truck next, with plenty of grease in the hinge points. I was going to fit the reflectors while out there until I realised they looked a bit scruffy and the machine screws needed cleaning up. |
|||
|
|
The screws and reflectors were brought into the workshop, cleaned, sanded and some red primer added to bare metal areas, ready for olive later tonight. While out in the garage, I also picked up the pioneer rack and brought that back in to clean up and re-paint. As it stands now, it would look a little out of place on the freshly painted truck. The same probably goes for the jerry can holder. | |
| ----- | |||
| October
15th/16th - Reassembly |
|||
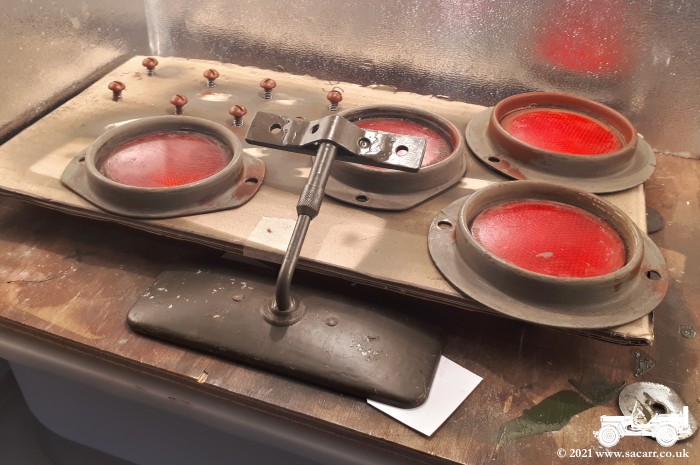
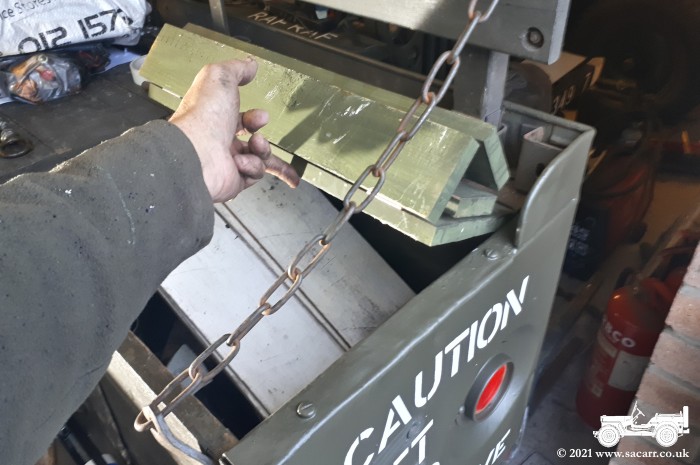
| After painting the pioneer rack this morning, the wind screen was refitted back on the Dodge. I got my first look out of the screen, over the now olive drab hood, at the big star. It's strange after seeing the checkers for so long. The four reflectors were fitted too and the bench seat chains, which had been removed for the Flying Control truck, were refitted. The rear left locker has a snapped hinge. For a while, I tried to free the rusted bolts to get the hinge off to weld, but the machine screws are rusted solid. I do have a plan to free them. | 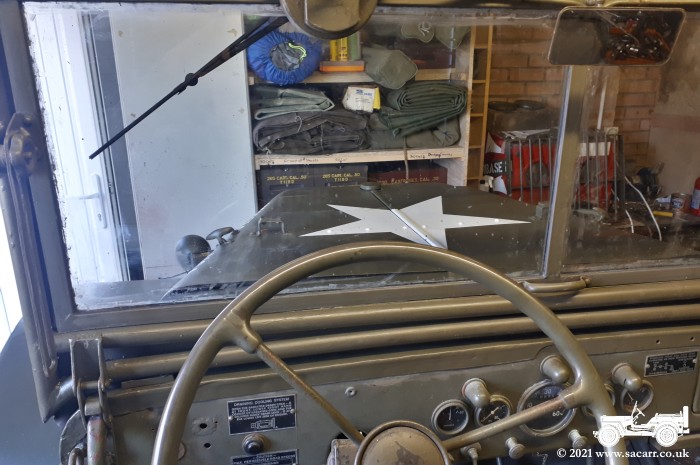
|

|
|
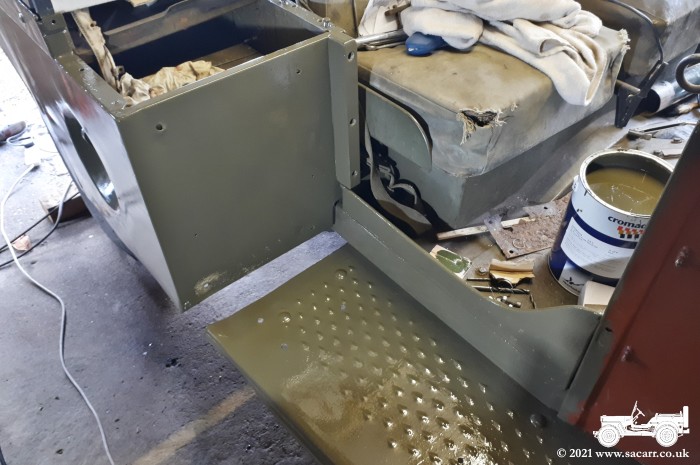
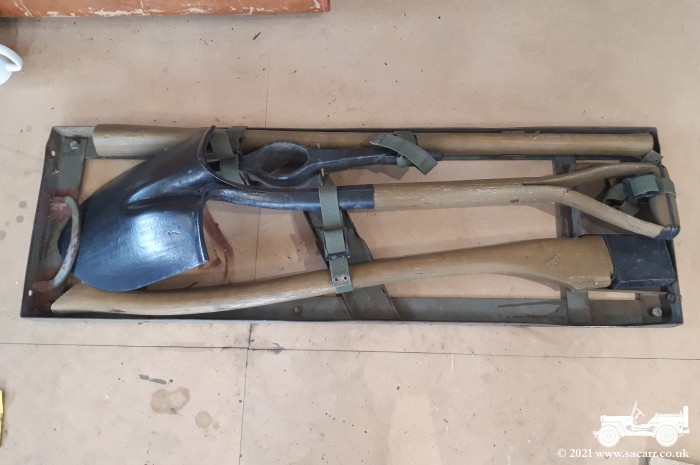
| The tatty canvas covers from the bench seat chains, were moved to the tailgate chains, to protect the paint work. The fabric is rather brittle having suffered from ultra-violet light. I have some spare thin olive drab canvas material, so Lynne has said she can sew some new covers. For now, the tatty covers will do to protect the paintwork. Amongst all of this, I've been cleaning up more nuts and bolts and painting them so the various parts can be refitted. I modified around twenty small coach bolts to fill in the aerial mount and other holes in the rear panels to keep the rain out. |
|||

|
The last job today was refitting the grille and head lamp guards, which was going well until I dropped on nut and it vanished. When it fell, I heard a clunk like it hit some wood. I searched the floor for ages before finally finding it wedged in the chassis rail where the front bumper mount bolts are. No idea how it managed to bounce to there! Eventually all twelve bolts were tightened up and the grille was done. Just the fenders to bolt up and the headlights to put back together, then the front end is complete. Once everything is back on, I'll touch up the paint on the bolt heads. | ||
| The Jerrycan bracket and door hinges were brought indoors to the workshop, after a bit of a tidy up in the garage. The bracket was sanded and a first coat of olive drab applied. It won't be long before the Dodge is ready to go and I've already got an event to attend in November for Remembrance Sunday. That will make two events with the Dodge in the same season, but in a completely different scheme! | 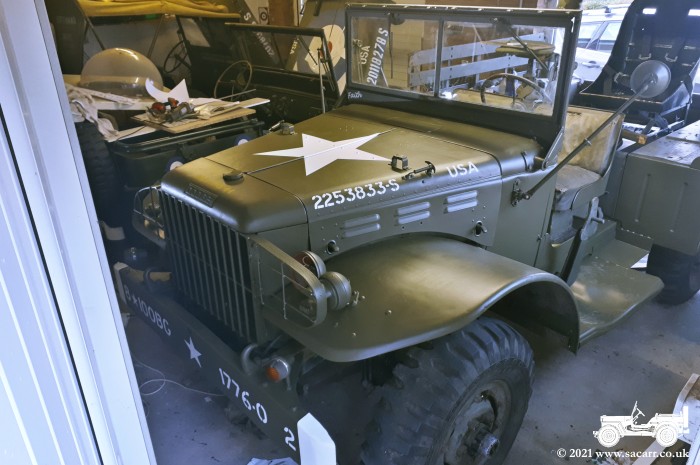
|
||
| First thing on the 16th, I fitted the pioneer tool rack to the back of the Dodge. The back no longer looks overwhelmed by stencilling. I'll leave it a few more days to harden before I fasten the tools back on. We then needed to call in on the old house ( which is still waiting for the sale to complete ) so I didn't get back to the Dodge until after lunch. |
|||
|
Once back, I bolted the fenders back onto the truck and then turned my attention to the lights. The mounting bolts are also the earth connection, but both parts were rusted. They were wire brushed clean and then tinned with solder for a more corrosion resistant contact surface. | 
|
|
|
The
headlights were then reassembled and after refitting the rear indicator, the truck was run and the lights checked. The indicators only work when the engine is running.
Twenty small coach bolts were fitted into the rear panels to fill the aerial mount holes and other holes of unknown origin. A little mastic was added around the base of each head to give a better waterproof seal. The white on the 'D' of speed was touched in with a brush afterwards. |
|
|
|
After that, I removed the rear right locker lid. This was a roll up lid that I made when I had the meteorological instrument panel fitted over the locker and the normal lid wouldn't open. I no longer needed the roll up lid, so refitted the original lid that I kept after removing it eleven years ago. There's still a few little jobs to do, but it's very close to being done now. | 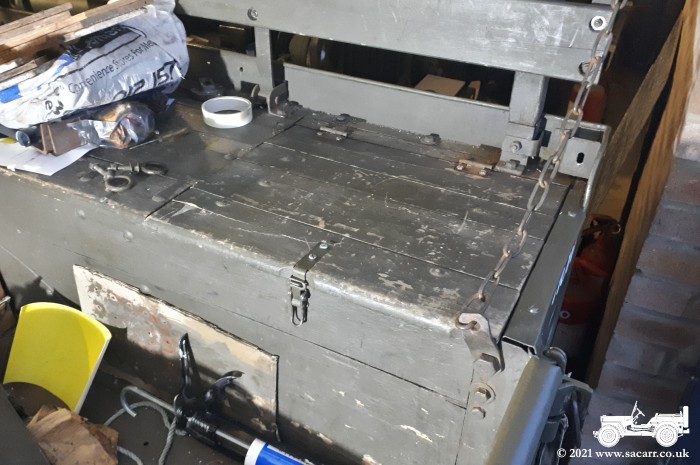
|
|
| ----- | |||
| October
17th - Test Drive |
|||
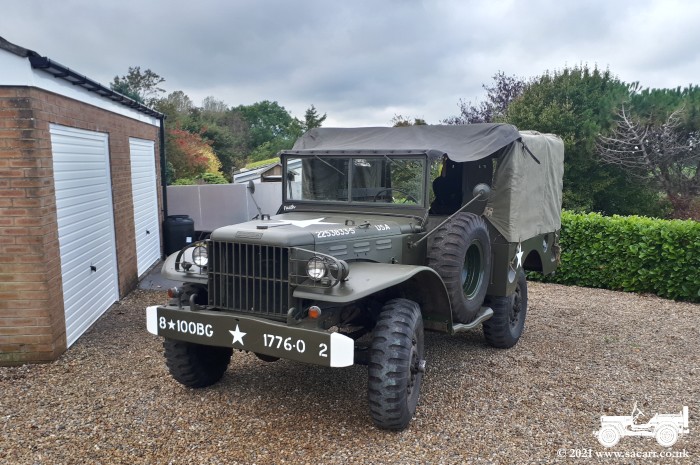
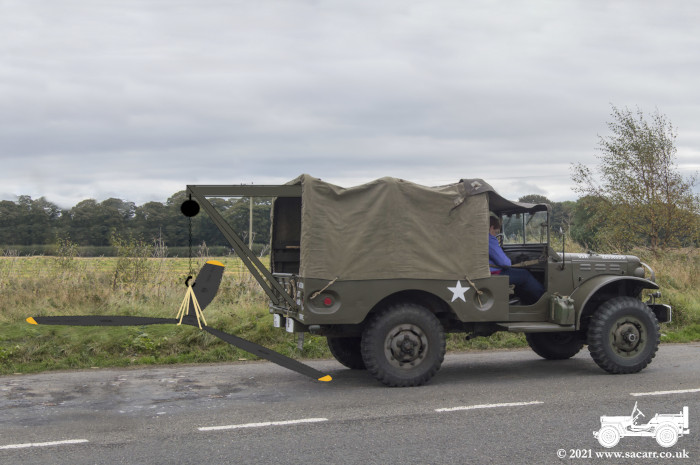
| With
nice weather until early afternoon, I fitted the Jerrycan bracket to the
Dodge, cleared up all the tools and rubbish in and around the Dodge and
brought it out for a drive. See the 2021
Events Pictures for more pictures of our local drive in the new
colours. |
|||
|

|
|
|
| ----- | |||
| October
18th/19th - Finishing Touches |
|||
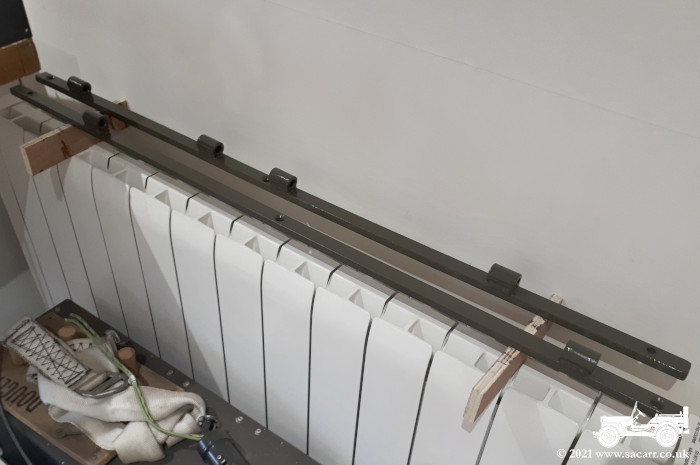
| The
18th was spent tinkering with some of the odds and ends that needed
finishing. The last pipe of the vacuum wipers was fitted up the side of
the screen and a number of screws, bolts and nuts were touched up with
paint. I'd left many of the fixings in primer as the paint would have
been damaged by the spanners, leaving them until fitted for a coat of
green. The spare wheel and washer were removed again and both painted to
match the truck. Both of the steel bars with the door hinges were
stripped, primed and painted and are now baking on the radiator. Last
little job was getting some measurements of the canvas chain covers on
the tailgate. The picture shows a piece of thin canvas material,
salvaged from the original Norwegian Army doors. They were much smaller
than the wooden doors I made for the Dodge and didn't really fill the
gap to the rear body. I kept the fabric and used the metal hinge
fittings for use on the wooden doors. |
|||
|
|
|
|
|
On the 19th, I carried on working on the door hinges. The paint had hardened fully overnight on the radiator, so I was able to handle then first thing in the morning. Before the Dodge was stripped down, the metal bars that support the hinge points, were bolted directly to the bodywork. I didn't want them to dig into the new paintwork on the truck, so I used a silicone adhesive to glue a strip of leather along the rear face. They were left a little while to dry and then the edges and front face was olive drab a second coat. | ||
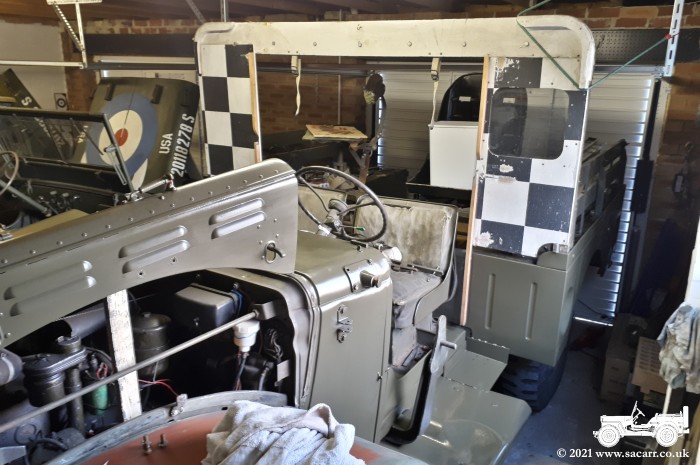
| Back out in the garage, I refitted the roof bows. On Sunday's run out, they weren't fastened into the sockets where they fit. There was play in the sockets allowing them to rock forwards and back and that resulted in the canvas being quite slack. Eventually, once the garage door has been enlarged, everything will be bolted up properly, but for now, I wanted them more solid, but also easily removable so I can get in and out of the current door opening. There were some existing holes through the bows and bench seat backs which would allow them to be bolted to stop the rocking. | 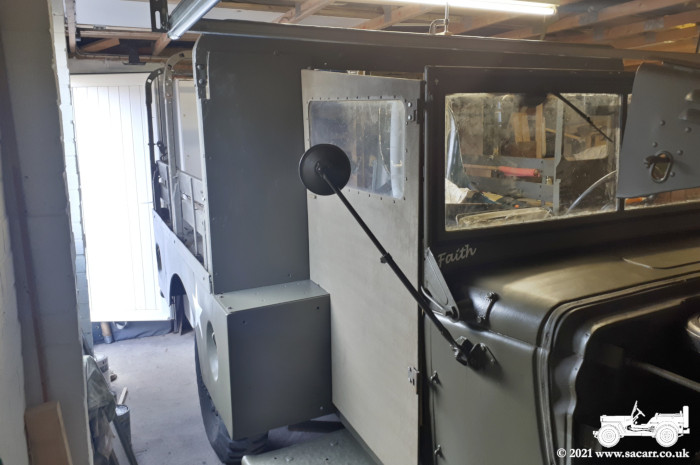
|
||
| Originally fitted with nuts in countersunk holes in the backrest, I needed an easier way of removing them quickly, so used a large washer over the holes and a butterfly nut. The front and centre bows had holes, so four coach bolts from the old wooden body were cleaned up and fitted. This held the bow in place behind the cab and that was checked against the door fit. On top of the bows, I fitted a six feet long piece of timber to tie them all together which would keep everything solid. More coach bolts were used to fasten this piece to the bows, but rather than butterfly nuts which would sooner or later take a chunk out of my head, I fitted 'T' nuts, countersunk into the bottom of the bows. | |||
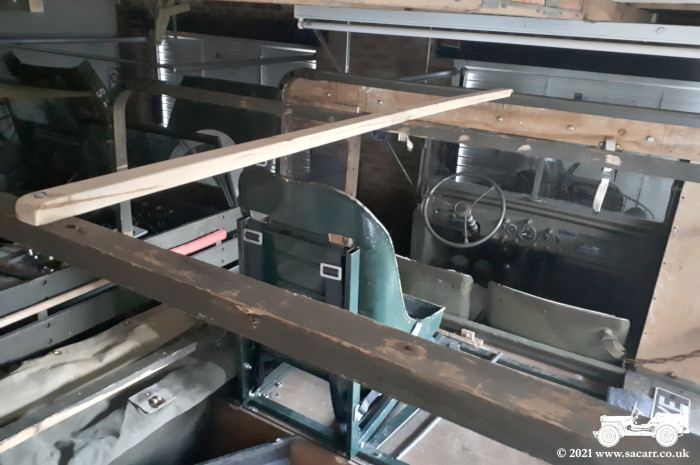
|
The coach bolts can be cut off flush. Eventually, I'll add some more strips of wood either side of this centre bar, to support the canvas and stop water pooling on the roof. After it was all fitting properly, the centre bar was removed and painted olive drab. The canvas cab rear curtain was also bolted back onto the front bow and rolled up out of the way. | 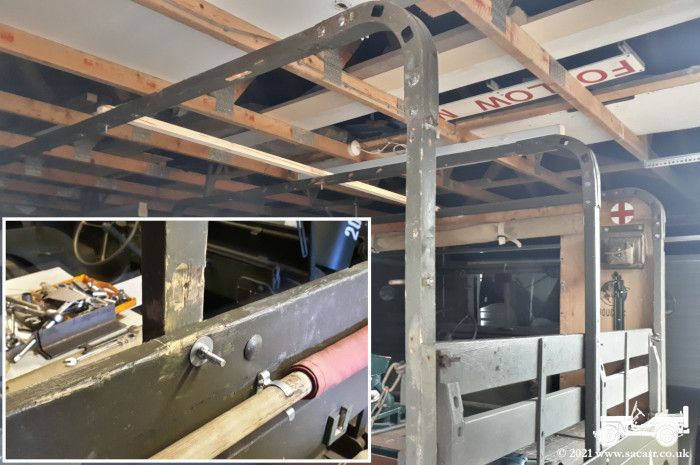
|
|
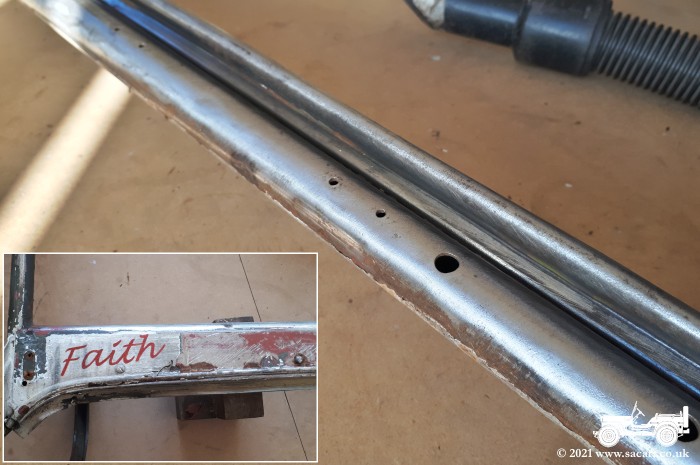
| October 19th ( additional ) - I persuaded Lynne to get her sewing machine out to make some canvas socks for the tailgate chains on the Dodge. The old ones had really suffered from age and UV light and had a number of holes with the fabric very brittle. I had some thin canvas off the old Norwegian doors which was cut, hemmed and sewed together into two new tubes. "Faith" the Dodge is very grateful for the protection it will give to her new paint job! | 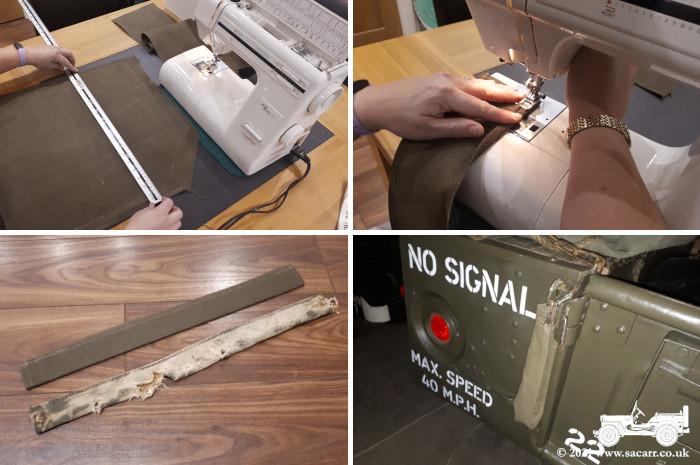
|
||
| ----- | |||
| October
20th - Finishing Touches & Markings Change |
|||
|
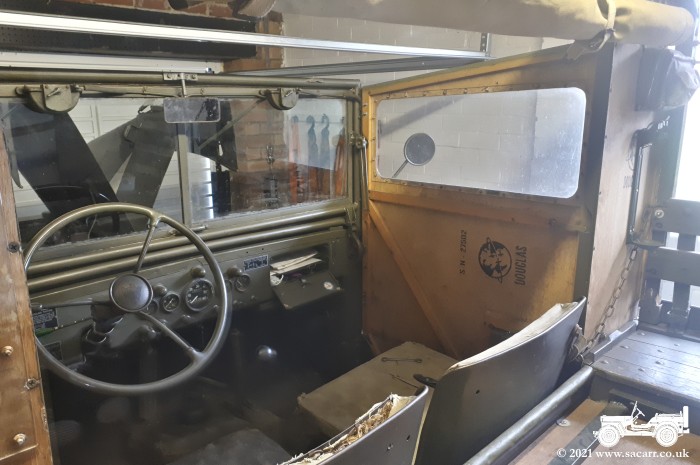
The door hinges were dry this morning, so they were bolted to the body and screen. There's a little play in the mounting holes which allows the door to be adjusted for a good fit. All three doors were fitted, then the driver's side top opening section of door was taken back off again to remove a warp. With the doors on and the spare wheel dry, that was also fitted back onto its mount. | 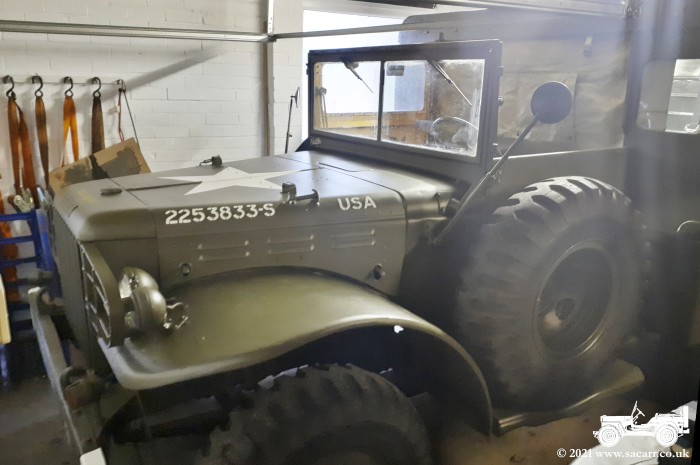
|
|
|
The cab canvas was rolled down to allow me to fasten pipe clips to the bow to hold the flag. On the front of the bow, a cup hook was refitted, which holds the canvas window open. | 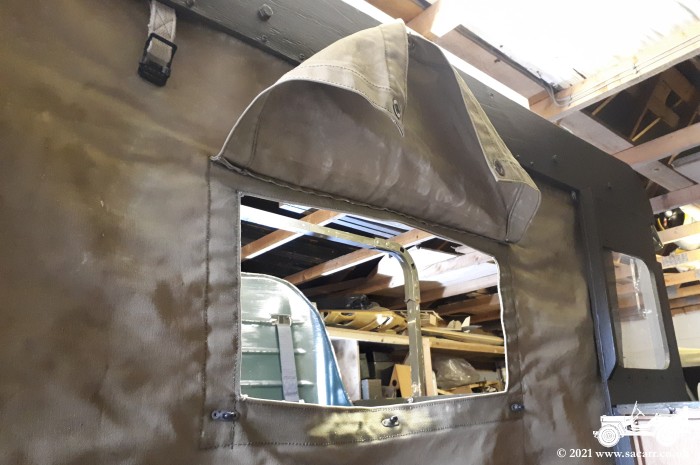
|
I haven't decided where to mount the registration plate yet. It was cable-tied to the grille, but I wanted to be able to remove it or fold it out of the way. So it may get mounted on the bottom of the bumper, but for now, it is just chained around the grille and can be removed. |
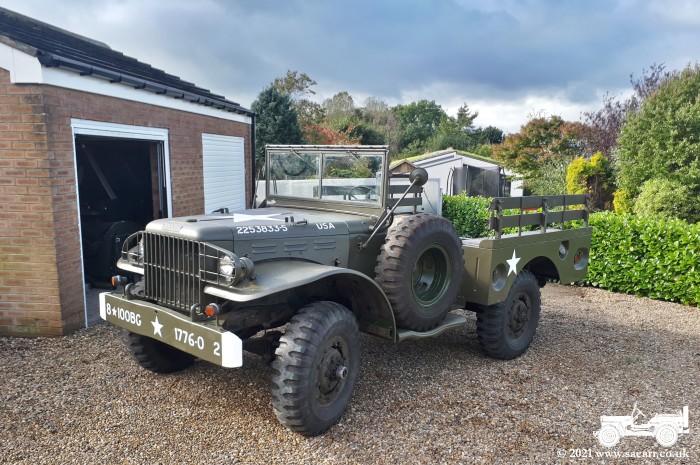
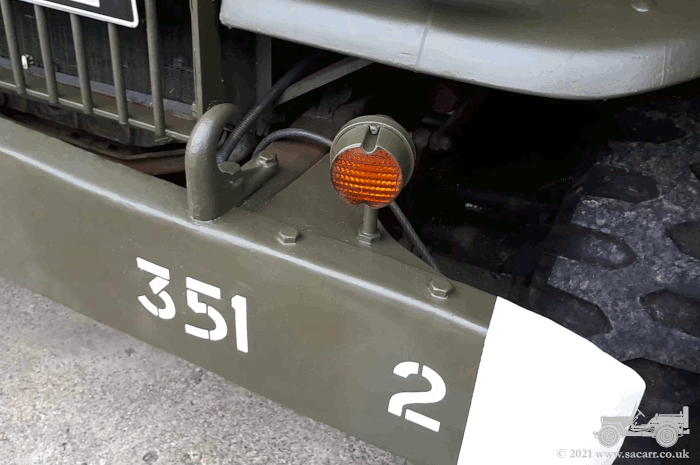
| Across the day, I also repainted some markings. I posted some pictures on the 100th Bomb Goup website, where someone pointed out that the 1776th Ordnance Company were attached to the 100th, but not part of it. So the bumper markings shouldn't have had 100BG on it. Much as I liked the idea of the Ordnance markings, it would have meant the Dodge no longer would have looked like it fitted in with both our Jeeps, which are in 100th markings. So rather than paint out the 100BG and replace it with 1776-0, I painted out the 1776-0 and replaced it with 351 for the 351st Bomb Squadron which matches our first Jeep. The 351st was one of four squadrons in the 100th Bomb Group and was the squadron that B-17G "Hang The Expense" belonged to - the aircraft I modelled at 1/10 and 1/6 scales. |
|
||
| ----- | |||
| October
23rd - What's Next? |
|||
| Phase one of the Dodge rework is done now. There's still a couple of little odds and ends to sort, such as a snapped locker hinge that needs welding. However, I'm planning for phase two now, which can't start until the garage doors are altered, as I need the height of the new
opening so the truck can be driven in and out without the need for
taking the roof off. |
|||
| When we stripped the old garage out, I removed the two steel 'I' beams that I'd fitted for my chain hoist and dolly to run on. My first thought on moving house was that I needed to refit them in the new garage. The Dodge rework opened up a new possibility for both a useful piece of equipment and a display item for the truck at shows. I plan to use one of the steel sections to make a gantry crane in the back of the truck. The chain hoist and dolly can easily be removed from the beam and fitted to the other beam which will probably still be fitted in the garage. For those that know military stuff, it will be like a No.7 set crane seen in GMC's, but on a slightly smaller scale. The plan is for the crane and Lyta's seat to be welded onto a frame that sits in the bed of the Dodge, but that can be removed as a whole unit if needed. It would allow me to do engine changes in the Jeeps, but also to easily move the engine elsewhere for work. I'm also planning on making a fibreglass B-17 propeller, unless the moulding costs outweigh the cost of a life expired real prop. I thought that having a prop hanging from the crane would make a really nice and different display at shows. So plenty of work still to do with the Dodge. |
|
||
| ----- | |||
| October
24th - Indicators and Locker Hinge |
|||
| On
Saturday 23rd, the postman brought a new indicator unit which was fitted
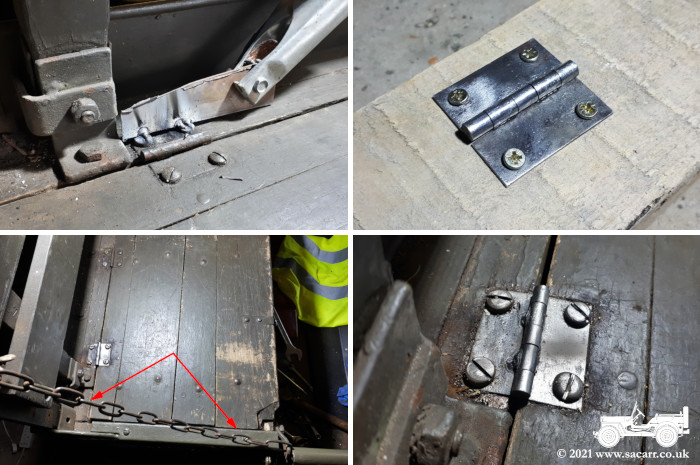
on the 24th. I switched to LED's some time ago and fitted resistors in the circuit to compensate for the loss of resistance. They were fine to start with, but have gradually turned to "Hyperflashing". A new LED compatible indicator unit was the best solution. It was a straight forwards fit, with just one earth wire and two spade fittings. The other fix for the day was a hinge on the rear left locker. It has been snapped since I bought the Dodge in 2010! No need to rush into these things. Part of the reason I didn't repair it earlier is that all the machine screws had rusted solid and I couldn't get the hinge parts off. The screwdriver slot didn't give me enough grip to resist the socket turning the nut. The bolt removal fix was to weld a piece of steel across the top of the screw heads to stop them turning. Two badly rusted bolts sheared, but the four other screws survived to be cleaned up on the grinder and their slots recut with a hacksaw fitted with two blades to give the required slot width. Once out, the hinge parts were cleaned up, the jammed hinge parts freed and they were then screwed to a block of wood so they could be welded. Larger welds on the top and some little ones on the reverse side, which were then ground flat so the hinge would sit flat. Once I tried putting the locker lid back on, I worked out why the hinge snapped. The locker lid wooden pieces had warped a little and someone in past years has tried to glue them back in place. The lid was glued in a slight parallelogram shape, rather than square. The red arrows point to where the lid was binding. The piece nearest the pivot was putting loads on the hinge which caused it to snap. I trimmed some wood off with the bandsaw and refitted it. The locker catch doesn't quite line up due to the parallelogram shape, but it still fastens and there's no load on the hinge now. |
|||
|
|
||